Through my many years of quilting I have discovered some tips and tricks along the way that help make things a little easier. I love to share those with others and this is one of my favorites because of the simplicity. It involves some binding and a pen - that's it.
 |
| I've found that when wound like this the binding is much easier to feed onto the quilt and takes up less room on my sewing table. Keep reading for an easy way to wind it up. |
 |
| Start with a pen and your length of pressed binding. |
 |
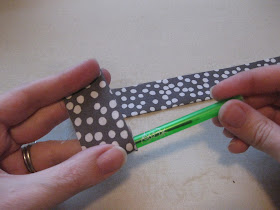
| Slip the edge that you will end while sewing into the cap of the pen. |
 |
| Now twist the pen to wind up the binding. The pen gives you something nice and big to hold onto while winding. |
 |
| Here's another angle of what it looks like just starting to be wound. |
 |
| Keep twisting and make sure to keep it tight. |
 |
| Keep winding until it is all wrapped around the pen. This one is large because it is the binding for a queen sized quilt. Put a pin in the end to hold it all together. |
 |
| Grab the pen cap with one hand and the binding roll with the other and simply pull out the pen. |
 |
| Voila! A very easy and stress-free way to wind your binding. |
 |
| Repeat as desired. - Yeah, I'm a bit behind on binding my quilts. |

Brilliant! :)
ReplyDeleteAwesome idea! Look at those neat and tidy bundles just waiting to be used.
ReplyDelete