Tuesday, July 31, 2012

Tetris Quilt-A-Long - Week 3

 I just adore the Tetris Quilt-A-Long!!  I'm so happy that Melissa from Happy Quilting decided to create and host this one.  I've been having so much fun and it's so fast and stress free!  When I woke up this morning I had to get going on my Tetris block.  It took a bit longer than I wanted it too because of frequent brakes to do things like feed my children (needy little buggers, lol).  But now it's done and I love it!

Here's the layout.  I was so excited with this one because I was making them fit like a dream.  I thought the last red one in the middle went the other way at first and that I was going to use all the shapes and not have any white spots.  Well, no such luck.  It did work out pretty well though and I'm going to have two squares of red to carry over to next week.

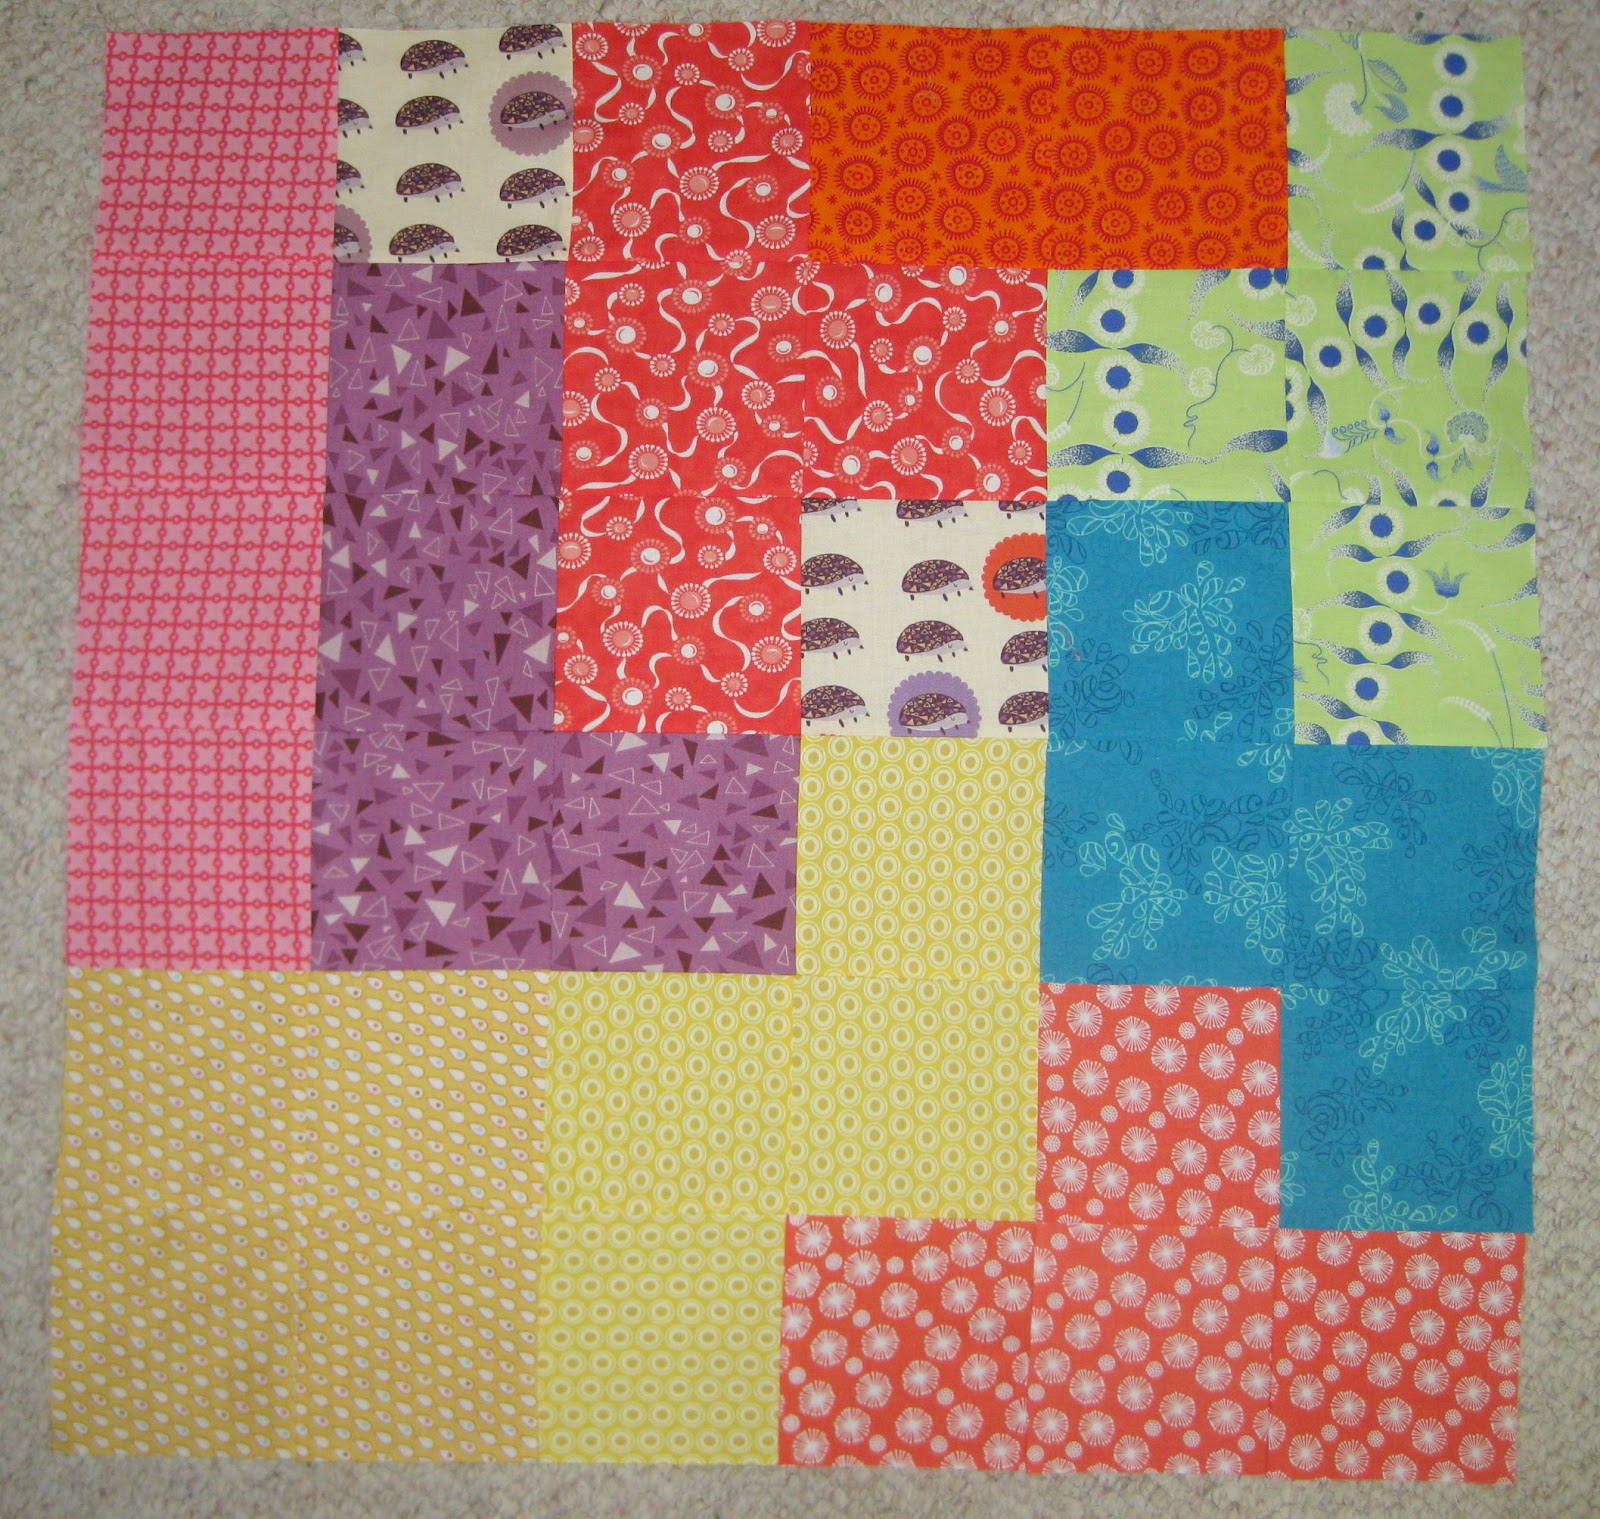
Here's the block for week 3.  I've got a curvy/circles thing going on this week.  Almost all the blocks contain circles except the green one on the top but it's pretty curvy so I think it works.  It was fun to have a sort of theme to the block this week.

Here are my three blocks laid out together.  I opted to put week three on the bottom again and I'm going to put week four on top of that.  I plan on saving weeks 5 & 6 for the top just in case I run out of colored fabrics I'll put white on the top and it will look like spaces ready to be filled in like a real Tetris game.  See the post from Week One and Week Two for how those came together.
That's for stopping by!  Be sure to check out other great blocks like mine on the flickr group or at this weeks post from Happy Quilting.

Thursday, July 26, 2012

TNT Thursday: Spray Basting

 I have a bunch of quilt tops lying around and I wanted to try spray basting.  I've never attempted that before so I was pretty excited to try it out.  Before I would use two by fours and tack them down then pin the quilt and remove it to machine quilt.  It was kind of a pain.  I'm linking up with Melissa at Happy Quilting for TNT Thursday because this is totally new for me!

Here I am taping the back down.  Sadly I don't have a floor large enough to accomidate a twin quilt so I invaded my friend's house with my four kids to play with her four kids and she taught me the ins and outs of spray basting.  It was so fun and helpful! 

Here's the first quilt all basted and ready to go.  LOVE!  My friend Leila told me to put a pin every 12" or so on the top.  She said it wasn't necessary it's like "wearing a belt and suspenders at the same time."  Cute analogy!

Here's the second one.  The pattern is found here.  It was more of a pain to baste than the first.  I got the backing taped down with the help of Leila's oldest daughter ( I think she did better than I did) and then I got the batting sprayed on.  When I was nearly done spraying I ran out of spray glue (bummer!) . Thankfully Leila had some more.  Sadly I used up all of hers too before we were done.  I had to pin the top on to the batting.  What a pain!  If there was anything that could have shown me the value of spray basting it was doing both ways back to back.  While pinning every 4-6 inches I ran out of pins, seriously what else could go wrong?  So I have them all pinned right on one side and then just enough on the other side to make it not fall apart.

In the end it was quite the adventure and I'm thoroughly sold on spray basting!  Hurray for trying new things!

Wednesday, July 25, 2012

WiP Wednesday: Mostly Mario

 After getting my fabric in the mail on Thursday I started my Mario Quilt Along.  I'm so excited for this one that Angela from Cut to Pieces is hosting.   It's postage stamp style with 1" finished squares in an 18" square grid.  This week I also finished up Week 2 of the Tetris Quilt-a-long hosted by Melissa at Happy Quilting.  That all combined with a family camping trip has made this a fun but busy week.  I'm linking up to WiP Wednesday over at Freshly Pieced where Colleen from The Busy Bean is the guest blogger this week. 

 Here's my progress thus far...
When I first heard of the Mario Quilt Along I instantly thought of this little man.  This is my oldest child and he just adores Mario.  See the cute shirt?  Proof of his love.  His sisters both got a new twin-size quilt this year and it was his turn.

We're working with Michael Miller Cotton Couture and it's so yummy!  I love the feel of it and I could just handle it all day long.  Which I guess is a good thing because these blocks take a chunk of time.

Since I was waiting on my fabric I got a week behind.  This is all the squares I need to make a Mario and Luigi block.  There are 344 just light blue ones all at 1.5" square.  Yeah, that took a while.

I printed off the grid with picture and proceeded to lay out the block on the rug in my craft room.  Seriously need a design wall or something for this!  It looks so fun all ready to sew together.  Too bad this is where my chair needs to be and there was nowhere else to do it.  I had to pick up all the pieces stacked by rows and now sew those together.

I've got five rows done the length of the block.  I'm chain piecing them all but living the threads connected so it's all basically one big piece.  When I'm done building the rows then I'll fold them over and sew them together.  It's actually surprisingly fast but I haven't had the time this week to get as much done as I want to.  I need to get cracking on it because remember the squares from two pictures up?  They're taking up my cut table and very vulnerable to tiny hands.

This week I also completed block two of six for my Tetris Quilt-A-Long (see the full post here).  I'm loving this project!  It is so fun and FAST!  I will be making this quilt again but slightly different I just don't know when yet.
 Well, that's about it for today.  I did some spray basting for the first time today but I'll write up a post about that tomorrow, it's too involved for a WiP Wednesday post and deserves it own since it was a new experience.  Hopefully I get both the Mario and Luigi blocks done this week as well as a bit of quilting.  Here's to another great week and thanks for stopping by!  

Tuesday, July 24, 2012

Tetris Quilt-A-Long - Week 2

 Hurray for Week 2 of the Tetris Quilt-A-Long hosted by Melissa at Happy Quilting.  I couldn't wait to make the block again!  Even though I just got back from a camping trip and I'm still covered in dirt I had to sit down and get to work.  Without further ado here's my fun block...

I carried over the orange squares from Week 1 on the bottom then I went to building.  Sadly I couldn't make the last block fit but I like it this way.  I love the flat top for great future building.  The colors also seem pretty well balanced.

Here it is all sewn together.  I used the hedgehogs again from last week to finish them off.  I really like the way these fabrics play off each other.

Here are my two weeks put together.  Week one is on the bottom and week two on the top.

Check out other fun blocks over at the Tetris Quilt-A-Long post or at the flickr group.

Wednesday, July 18, 2012

WiP Wednesday and TNT Thursday: New Addictions

 I had so much fun this week!  I picked blueberries, raspberries, and blackberries with a friend.  We went to a parade and carnival in a local town, I tried out knitting and Tuscan crochet, got a bunch of fun new crafty supplies, FINALLY made progress on my crochet fusion blanket, and made my first block in the Tetris Quilt-A-Long!  What a busy week!  I'm linking up with WiP Wednesday over at Freshly Pieced and TNT Thursday over at Happy Quilting.

Here's my small fry with a blueberry.  He just LOVED them.  We started by picking raspberries and he thought those were okay until he tried a blueberry.  Later when we put both on his plate for lunch he ate all the blueberries and donated the raspberries to his Dad's cause.  The next day we went back for more blueberries and some blackberries.

Saturday brought a parade to the city next to us and our family had so much fun!  Don't worry, all those kids aren't mine.  I have the three next to/on top of me and the one in the orange ball cap on the red chair.  The rest are good friends old and new.

I attempted knitting for the first time ever!  I've crocheted for over seven years now but felt the urge to try what other people have told me was the easier skill.  It may be my years of crochet experience talking but I think they're on something.  Knitting was TOTALLY harder for me.  I'll have to hold the verdict until I've been doing it for more than two days.

Here's my first knitting attempt.  This is a garter stitch.  I was able to cast on, do the stitch, and later bind off.  I learned all of this from a book that came with my knew knit kit (Susan Bates Learn Knitting).  I think it might be easier if I did it while watching someone like on youtube but the computer was unavailable.  It's not perfect but I'm pretty proud of my first attempt.

I also tried Tuscan Crochet.  FAIL!  Seriously, this was an epic fail!  I tried three times and this is the best I came up with.  There are enough rows here that it should have been flat and pretty but it looks more like a Churro.....

See the resemblance to the above crocheted thing?  Yeah if only it was tan not pink I would have totally made this.  Too bad I wasn't attempting to make a churro.

Look at all my fun new crafty things!!  Thank you Joann for a fabulous coupon and sale combo, also my cute hubby for supplying the funds.  I got my learn knitting kit, some yarn, the crochet thread I need for my fusion blanket, two quilting templates (one as dragonflies and one has roses both with meander) and pencils to draw them on.  A Tuscan crochet hook, a walking foot, and a 1/4" foot.  I haven't tried as many of these as I've wanted to but I hope to in the next week.

I finally finished sewing and flipping all 99 charm squares for the crochet fusion blanket.  I had to sew 198 squares together, trim the corners and then flip them right side out.  It took a lot longer than I wanted it to.  I still have to do two rounds of top stitching before I can do a blanket stitch with my crochet thread and THEN I can finally start to crochet around them.  I thought this project would go much faster than this and it's getting a tad frustrating.  This is Sassy by Sandy Gervais for Moda in case you were wondering.

This is the stockinette knit stitch.  To make this I had to knit one row then purl one row.  I was okay with the knit row but the purl row gave me a bit of a challenge.  It was difficult for me to switch in my brain from one to the other.  I also learned that while the stitches may be "easier" there are so many more ways for knitting to go wrong.  For example, if your crochet hook falls off, not really a big deal.  If your knitting needles fall off, oh my freaking gosh it's a mess!  Yeah, not a fan!  As a consolation prize my hubby saw this and said, "hey, it looks like a sweater!  Could you knit me a sweater?"  Um, yeah right!  I've only been doing this for two days!

Here's the back of the stockinette knit stitch.  There are a few problem areas but I'm still pretty proud of it.


Yesterday was the first block post for the Tetris Quilt-A-Long.  I was so excited I had my block completed within an hour of finding the post.  See the full post on this block here.
I had so much fun crafting and playing this week!  I love it when productivity and good times come together.  Here's to another great week and thanks for stopping by!

Tuesday, July 17, 2012

Tetris Quilt-A-Long - Week 1

I adore Tetris so when I heard Melissa at Happy Quilting mentioned she was going to do a Tetris Quilt-A-Long I knew I had to be a part of it.  After a fun charm swap (that Melissa also put together) I had everything I needed.  Today she posted the instructions for the first block and I whipped it up this morning.  Here's how it all came together:

First she had us print out a plain grid on a regular piece of paper...

Then she gave us the pieces we were to use, and their color, in order.  We all had the same pieces to work with we just had to pick where to put them.  The yellow square in the bottom left was the first piece.  I was rocking it up until the red one at the top.  It's my old Tetris competitiveness coming out.  We used to have tournaments when I was a kid with my four siblings and parents.  It was a blast!

Then we had to pick our fabric to match the chart and lay it all out.  I was worried with the two yellows together but I think these are different enough that you can tell they are different pieces.

Here's the completed first block!!  I love it!  I can't wait to make more and see it all come together!

I'm linking up with the Tetris Quilt-A-Long - Week 1 post over at Happy Quilting.  I'm also linking up at Plum and June for the Let's Get Acquainted Blog Hop Week 9.  There some fabulous advice on voice as well as a $40 giveaway!

Weekly Calendar:

July 17

    Katie from Kati's Quilting
    Claire from Sewing over Pins
    Caroline from Quilting in the Cold

July 19
    Jamie from Sweet Baby Jamie
    Janine from Rainbow Hare Quilts

Wednesday, July 11, 2012

WiP Wednesday: FMQing Extravaganza!

I got my free-motion quilting foot in the mail last week and couldn't wait to try it out!  I've never even attempted something like this before (I only once machine quilted but it was straight lines with a regular foot) so I was super excited.  I tried a few different techniques with varying degrees of success.  I know I need A LOT more work on shapes (like flowers).  I'm pretty great at meandering, my favorite, and I need a walking foot for straight line quilting.  I had four extra blocks from the Skill Builder Sampler and made a bunch of 12" minis for my kids toys.

Since this is certainly a work in progress I'm linking up with Freshly Pieced where Kati, who blogs at From the Blue Chair, is the guest blogger this week.  I'm loving all her projects and she gave a great advice post on Monday for the Let's Get Acquainted Blog Hop at Plum and June.

 Here's my fun attempts at free-motion quilting...

Sadly this didn't come out like I pictured in my head.   In my head the flowers were all cute and even mirroring the petals in the block.  In reality they were all kind of lopsided and odd shaped but it was fun anyway.  I learned that I can't go from shape to shape without cutting my thread.  I have an open front foot and the thread kept getting caught.  Many of my flowers are crooked because the thread got caught on the foot and yanked it over.

Here's the back side of that same one.  You can see the flowers better here how they aren't the same.  You can also see a few times where my thread got caught and bunched.  Many of those were a result of getting caught up in the foot.  The straight lines are straight-ish which makes me happy but I think a walking foot would be better for this.

I did this really nifty loopy lines for this one and I loved it!  After two passes I really had it down and loved how easy it was and how fun they came out.  I will be doing this one again!  I used the middle print for the back and you can't see the quilting at all, even in person, so I didn't post a picture of that one.

I adore this block!  It's the green mountain star block and it's one of my favorites from the sampler.  I didn't want the quilting to distract from the block so I stitched in the ditch around every blue shape.  You can see it better on the back side...


Here's the back of the Green Mountain Star.  LOVE!  I don't think the free motion foot was the right choice for this block but I love it anyway.  It looks so fun even if the lines are a bit shaky.

This is the Beacon Light block from the sampler.  I had a really hard time making this one because this style was new to me and it didn't come out square at all!  Anyway, I decided to try meandering with this one and had so much fun with it!  You can see it in the middle a bit but it's much better on the back side...


Look at that fancy meander!  I'm so happy with it!  I love how fast, easy, and stress-free this style was!  I will be doing this again.

I tired out this nifty trick I saw on Pinterest and LOVED it!  My template didn't print with seam allowances.  They were too light to see, so I taped two pencils together to add seam allowances to the templates.  See the full post of instructions and demo here.


My last WiP project pictured is my mom's Papillon quilt.  I've done half the blocks which are pinwheels and I have half remaining which are a star block.  I'm so happy to be done with these as I had to make then trim down each HST block.
Also this week I got a 1/4" foot which I'm excited to get piecing with and a walking foot, which I can't wait to use.  I'm really getting into quilting my own things!

I have a lot of other things I made progress on this week but my hubby accidentally took the camera to work with him and thus I don't have pictures.  Here's the run down...

- Crochet Fusion Blanket - I have half the charms sewn together and I hope get the rest of them sewn together this week and then the top stitching done as well.
- Preemie Crochet Hats - I made five more this week.  I've been slowing down on these because I've been crazily working on quilting.

That's about it for this week.  Thanks for stopping by!