Thursday, July 5, 2012

WiP Wednesday: or Thursday?

I was so busy with the holiday yesterday that I didn't get to write up my WiP Wednesday post.  Then I was catching up on my blog reading and I saw that Lee at Freshly Pieced left the linky open for two days!  Hurray!  Jess from SewCraftyJess is the guest blogger and she has some really great projects.  I feel like I did so much this week but have nothing to show for it.  My sweet hubby says I'm in the grunt work stages where there's not so much to show for it but a lot of work.  Then I remembered a lot of other things I've done since the last post.  I guess this week has just taken so long to pass that I forgot about all I did.  Here are a few representative samples of my week... 

First off I finished the last of the blocks for the Skill Builder Sampler!!  I just loved doing this and I learned so much!  See the full finish post here.

I tried FMQing for the first time, with the wrong foot, and a lot of laughing.  I did one 12" mini and had so much fun even if it isn't perfect.  Read all about my acrobatic attempts at Free-motion quilting here.

Look!  My hubby is helping!  Isn't he amazing?  I sewed 112 squares together to make 56 that needed to be cut in half to form 112 HST.  (It's all for this quilt for my mother).  I was not looking forward to making it through that pile when my hubby came into my craft room and I enlisted his help.  He was a little leery at first but then I told him all he had to do was cut on the marked line and he probably cut about as many as I did.
I love the look of trimmed down HST blocks so I always make them a smidgen big and cut them down.  This is tedious when there are 112 to do but I'm persevering and have 61 done so far.  I keep telling myself it will be so worth it when the quilt turns out.  By the way this is Papillon by 3 Sisters for Moda if you were interested.

I found another excuse to buy more cute fabric!  I joined the Fusion Blanket Crochet Along that began this week.  I'm so excited for this project!  Basically you sew the charm squares right sides together, flip them right side out, then crochet around the outsides, and finally crochet all your blocks together.  It's the best of both worlds!  Here's the button...


I also whipped up a few more crochet hats.  I wanted a new embellishment for the girl hats but I wasn't loving a lot of the flowers because they just seemed to look huge.  I love the bow though and I wrote the pattern myself.  It's pretty simple and was so much fun!
I'm also having fun keeping up with the Let's Get Acquainted Blog hop.  There is a great giveaway this week for two quilt patterns.  There are currently under 30 entries and three winners so your chances are great!  All you have to do is click on the link above and leave a comment on the post.  There were some fabulous post by fellow hoppers, go check them out here...

July 3
    Di from Willowbeck Designs
    Jennifer from Knotted Thread  
July 5
    Sarah from Sarah Lou
    Catherine from Knotted Cotton
Click here to find links to the awesome tutorials from the last six weeks and to see some fantastic events currently being hosted by blog hoppers.

I'm linking up with Freshly Pieced for WiP Wednesday.  Thanks for stopping by!

Monday, July 2, 2012

June Recap

 Lynne from Lily's Quilts hosts the Fresh Sewing Day and the Small Blog Meet.  I participated in both last month and loved all the diversity of people I found on there and the people that found me.  I gained 6 followers (for a total of 15 now!) and I have seen that many have come from these links.  Part of the Fresh Sewing Day we're supposed to recap what we did the previous month so here's the highlights...

I crocheted this dress for my friend's ten month-old baby.  It was so fun and fancy I loved watching it grow as I worked on it.  See the original post here.

I finished my disappearing nine patch quilt using A Walk in the Woods by Aneela Hoey for Moda.  I love how it turned out and I need to get on taking a long arm quilting class so I can quilt it myself.  Maybe next month.  Here's the finish post.

I've been hard at work crocheting hats for my local NICU for preemies and newborns.  They are so fun and fast!  I've made twenty so far these are just a few of them.  You can read more about that here and see some closeups of the cute ones.

I finished the last nine blocks to catch up with everyone else and complete the Skill Builder Sampler.  See the finish post here.  We worked on three blocks a month for a year to put this together.  My friend Leila over at Sewn by Leila hosted it and did a fabulous job writing tutorials and keeping everyone motivated.  I learned so much!

On the last day of June I tried my hand at Free-motion quilting.  I did pretty well but had a laughable experience trying to do it without the right foot.  To read about it and see what I learned go to this post.
In July I hope to practice some more FMQ with my new foot that should come in the mail any day now.  I hope to finish the quilt I started yesterday and take a long arm quilting class.  I'm starting in on the Mario QAL and the Tetris QAL soon and can't wait to work along with those.  Also some more crochets baby hats. Anything else would be a bonus.

In an effort to motivate me I'm doing the One Thing, One Week Challenge put on by Amy from Amy's Creative Side.  With a giveaway for those who completed their goal it's the perfect way to get motivated.  I said I wanted to finish the 28 pinwheel blocks for my mom’s quilt. I started it last night and can’t wait to move onto the sewing step.

I'm linking up with Lynne's Fresh Sewing Day and Small Blog Meet.  Click the buttons to see other fun bloggers like me and thanks for stopping by!

Lily's QuiltsLily's Quilts

Free-Motion Quilting - Pass/Fail

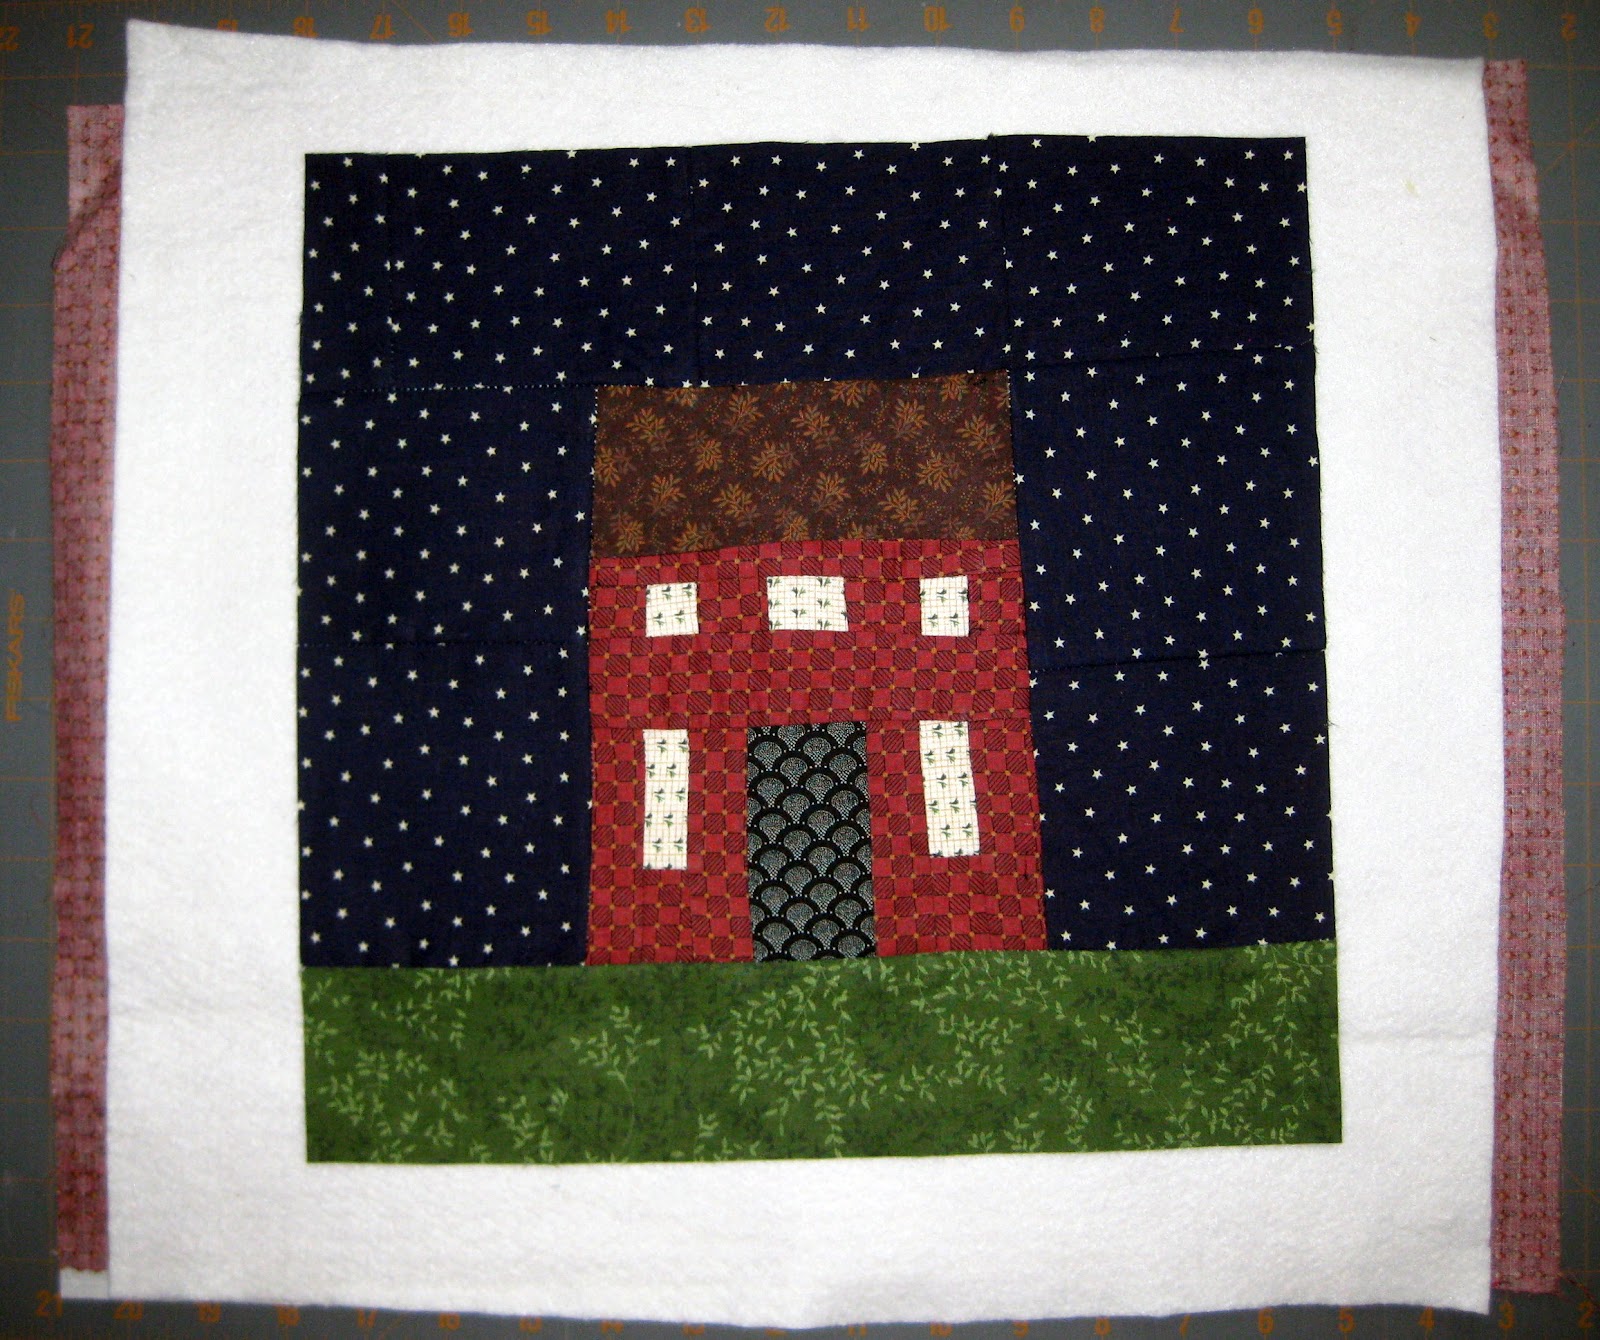
 After completing the Skill Builder Sampler I was feeling brave and wanted to try my hand at free-motion quilting.  I was quite determined as you will discover in this post it was a real pass/fail kind of experience.  I had a few blocks left over from the sampler and an bit of extra batting lying around so I figured what better way to use my skill builder sampler blocks then to build a new skill doing free-motion quilting.  I'd heard a few things about it but didn't really know much.  I knew that you needed to lower the feed dogs and that you guide the quilt around with your hands to make shapes/designs.  I'd vaguely remember that you needed a special foot for this but I thought, "how much could that really matter?"  HAHAHA!  Read on for my adventure!

Here I'm all ready to go with my Improv House (Block #12) a bit of cotton batting and some backing that perfectly matches the body for my house.  This fabric is all from a quilt I made about 10ish years ago so I'm pretty happy I had enough to finish the mini.

Now we get to the really laughable part!  With my regular pressure foot and my feed dogs down my quilt would not move!  It was pinned by the foot in place.  With the foot up the needle would pick up the fabric and would make sloppy horrible stitches.  It was a mess.  Did that stop me?  No, but it probably should have.  I'm pretty stubborn so I used one hand to lift the foot up just a little so the fabric wasn't pinned but not wobbly either.  Then I used the other hand to move around the fabric (see the above picture).  It was pathetic.  At times I really needed my right hand so I'd wrap my left arm around the machine like a hug and lift the lever from the back.

I persevered and finished my 12" by 12" mini.  It's not perfect.  The grass is not consistent and there are parts in the meander that the thread caught but hey, look what I was working with!  I also learned that slower is not better for me.  I often would move my hands faster than the needle and ended up with some pretty large stitches.  When I sped up I noticed a lot more even stitches and it looked nicer.

Here's the front!  LOVE!  It's already been claimed by my cute kids to wrap up babies and stuffed animals.  They don't care that it's not perfect and it was fun practice.

Here's What I Learned:
- I am involved with the Let's Get Acquainted Blog Hop (my day is September 13) from Plum and June.  There are many many fabulous bloggers a part of this and they have put together an email list for any questions we have we just shoot everyone on the hop an email and they help us out.  I got 11 responses to my quest for finding the perfect Free Motion Quilting foot.  Many of them were new to the skill too and wanted to know more.  Here's the skinny...

- You need a special foot, often called a darning foot!  It's spring loaded, that's the important part. That's the bit I was missing on my attempt.
- There are different kinds!  It's important to get one that fits your specific machine.  While it doesn't HAVE to be made by your same company it's probably a good idea.
- I have a Singer Confidence 7470 and it's a low shank vertical needle.  When looking for a foot I had to make sure it specified that it fit my model and was a fit for the type of machine it was.
- Metal is better than plastic!  - Nearly everyone I've ever read anything on has agreed with this.
- Open foot is nice so you can see where you're going and a great selling point but if they don't make one for your specific machine it's not the end of the world.
- Ebay is KING!  I got my foot for half of what Singer said it should sell for and that included shipping.  The seller is a Singer authorized retailer and listed my machine specifically (with only four others) that this foot fits.  Hurray!

One last thing...
SewCalGal is doing a Free Motion Quilting Challenge.  It started back in January and goes through December.  The idea is that you learn new skills and practice each month.  They have experts on the blog to teach you new things.  There are prizes and giveaways if you play along.  It seems like just the motivation I need to keep up.  Thanks Ginny from Fish Creek Studio for the heads up!

Friday, June 29, 2012

Skill Builder Sampler Blocks - FINISHED!

 Hurray!  I can't believe I've finished the Skill Builder Sampler series.  It's been going for so long!  Well, not as long for me as everyone else.  I originally found the sampler and started quilting along in November (see my first post here) but everyone else started in June.  Then I really couldn't get into it in spite of my best efforts.  I decided it was my fabric frustration and restarted in March (see post here).  The restart was fabulous and in about three months I cranked out all 36 blocks, some of them for a second time.  For all the posts involving sampler blocks go here.  Otherwise read on for the last installment...

Block #35 - Feathered Star.  I did the paper pieced version (found here) and I loved it.  Then again I am a huge fan of all things paper pieced.  I think it turned out great!  I have only one or two points that will be cut off when sewn to another block.  I think that's pretty good all things considering.  This block finishes up to 12" so those little HST are REALLY TINY!  I don't think I've worked with something that small before.

Block #36 - Alice Brooks Butterfly.   Being the last blog in the sampler means this one was hard.  Although for me it was more time consuming that really crazy difficult.  I only had to unpick twice, which is pretty good with all those crazy curves.  I did make it a bit too big and thus the points of the wings will be cut off but either way, hurray!

I decided not to make some of the blocks the second time around and thus I was short a block for my 36 block layout.  I decided to go back and do the Bonus Block #2 the Green Mountain Star Block.  I loved it!  Especially after doing the last blocks of the sampler going back to this one was a piece of cake.  It went so quickly and looks pretty sharp.

Here are all my sampler blocks together.  I don't know how I'm going to assemble them yet.  I may need to think on this one or just see what Leila suggests.  Either way this is quite the accomplishment.

Here's a close-up of the bottom left from the group shot.

Here's the bottom right of the group shot.

Top Right of the group shot.

Finally the top left of the group shot.

These are my blocks from my first attempt at the sampler. (See original posts here from top left... one, two, three, four, and five).  I was using my scraps which are in a very large tote and it was so hard to find what I needed big enough and that matched the others.  Thus, I restarted with new fabric.  The top three I remade but the bottom two didn't make the cut the second time around.  I replaced them with both bonus blocks.  I made them so I could learn the skills but they won't be in the final quilt.  The kids love these blocks and have asked me to make pillows out of them.  We'll see what happens.

A big thank you to Leila for putting this together.  I learned a lot while putting this together and had so much fun!

Wednesday, June 27, 2012

WiP Wednesdayand TNT Thursday: Minor Mishaps

 I find that sewing, especially when I'm doing it, is filled with minor mishaps.  Nothing too life shattering but just enough to frustrate and then excite when they are overcome.  I had a week FULL of those.  I know I'm not alone as I've read about these on several other blogs recently.  I'm linking up with WiP Wednesday at Freshly Pieced and with TNT Thursday at Happy Quilting where I know I'll find people who know what I mean.

Here's the story...

It all started with the Tetris Charm Swap.  It is my first ever fabric swap and I'm so excited!  I got my fabric from The Intrepid Thread last week and excitedly started cutting the 112 5" squares in each color.  Sadly I cut six of the red one 4" x 5".  I was so upset!  I only had enough fabric if I did it exactly right.  I was stressing out and went to Melissa from Happy Quilting to tell her my problem and that I may be a little late getting her the fabric.  I went back to The Intrepid Thread to get some more red to be shipped to me and they were sold out.  I shot them a quick email to see if they really were sold out or if Julie had enough for six charm squares she could send me.  Julie saved the day!  Not only did she have enough she sent it to me, including shipping, for FREE!  Yup, she's my hero and just earned herself a VERY loyal and happy customer!  In the end I got just what I needed and the crisis was averted.

Then we had our next crisis.  I have never seen such a huge spider in real life before.  I've seen ones that cover a larger area with long legs but this one was beefy.  My hubby was out mowing the lawn and spied this spider on our wagon.  He grabbed a jar and put it in there.  Seriously I wouldn't have been able to get that close to it.  The very thought makes me shudder.  You see all the tiny baby spiders all over the jar?  It wasn't like that when he first put her in.  She was huge and had a furry back.  A while later my daughter was looking at it and said she thought they might be baby spiders, sure enough they were.  At the point when I took this picture they had moved off the mom and were all over the jar.  We didn't know what to do with it now.  If we opened the lid they'd be everywhere and we couldn't squish them all.  The thought of this nasty anywhere near my house was not appealing so in the end we just threw it in the trash, jar and all, for the trash man to pick up today.  I was happy to see it go and wish them a happy life in the dump.

I'm on the last three blocks of the Skill Builder Sampler by Leila over at Sewn.  This is Block #34 - Newport Compass.  I found the pattern here for 99 cents.  They have a lot to choose from but I loved this one.  It's paper pieced so it looks pretty good but it wasn't without it's mishaps either.  When I paper piece I love to cut my pieces much larger than necessary so I don't have to worry about lining them up perfectly.  Well, seeing how these were the last blocks in the series I was running low so I had to cut them smaller than I'd like.  This led to several unpicking sessions after I didn't align them properly.  It all worked out in the end and I just LOVE this block!

Last week I started making hats for preemies in the NICU.  I had a lot of fun and made nine (post here).  This week I decided to make some for newborn sized babies too.  I had two babies in the NICU after their births and they would have been too big for the little hats.  I didn't have a pattern for the larger size so I had to make one up myself.  This led to a few unravels but in the end I got it just the right size.  Also I adore watching TV while I crochet and my lack of attention led me to a couple of missed stitches that I had to unravel back to and fix.  Just minor things, especially with a hat this small everything is minor, but a bit frustrating in the end.

Through this week I learned that stuff happens and there is usually an easy solution.  Either grab the seam ripper, email you new favorite fabric store, or unravel that yarn.  The world keeps on spinning so don't let it ruin your day and just try to make the best of those minor mishaps.

Thanks for stopping by and have a great week!

Wednesday, June 20, 2012

WiP Wednesday: Getting Involved!

Oh my goodness I've had such a great week!  I've worked on and finished a lot.  Also, as you may guess from the title, I've been getting more involved in the blogger world and having a blast doing it!  I've made new friends (Hi Cynthia!), joined my first ever fabric swap (so excited!), joined two quilt-a-longs (Mario and Tetris).  That's all added to my regular to do list, keeping up with the Let's Get Acquainted Blog Hop, and the Skill Builder Sampler. I also added a bunch more blogs to my blog additions side panel.  Finally, I spent WAY too much money on fabric recently and it's beginning to arrive in the mail, hurray!

Today I'm linking up with Freshly Pieced where Sukie is stepping in for Lee this week.  As always it's the best place to be on Wednesday to find inspiration for future projects which I love even if I am a tad overbooked.

 I'll start with the Crochet projects.  I mentioned at the end of my last WiP Wednesday post that I was loving Rosie's Cozies and wanted to make some hats for my local NICU.  Well, I've made a bunch of progress with that!

Right after last weeks' post I decided to get going on the crocheted preemie hats.  I bought eight new skeins of I Love This Yarn! from Hobby Lobby and added that to a white one I already had at home and I was ready to go.  I went with pretty basic baby colors and think I may branch out in the future.

The lady at the Hobby Lobby gave me this GIGANTIC bag.  Seriously?  I only bought eight skeins!  they could have easily fit into two small bags without even trying.  This bag is so big my 5.5 year-old can fit inside!

We were having some more fun with the big bag and discovered my two smallest ones could fit at the same time.  You know that whole this bag is not a toy thing?  Yeah, we totally ignored that!  Don't worry though, I didn't let them play with it alone and sadly through all the fun it got a big hole in it so it can't even hold my stuff anymore.

Here's my first preemie hat finish.  Isn't it adorable?!  I used the pattern from The Dainty Daisy but I modified the ears a little bit.  She glued hers on but I worked them in with the backing color and they are double thick with the back used to create an edge.  Don't you love you tiny it is?  Yes, people can actually have heads this small.

Here are the nine hats I've finished so far, I finished the last two today.  I made one in each color with three bears, three with ear flaps, and three bunnies (although my kids think they are Kangaroo ears, odd).  I can't wait to make a bunch more!  I'll be making newborn size next because I know from personal experience preemies aren't the only babies in the NICU.

Here's a close up of the bunny using my little girl's favorite doll.  I created the ear pattern myself and in spite of my kids insisting they are Kangaroo ears I like the way they turned out.

Here's the bear variation.  I love the fat edge on those cute ears!  I took the ear pattern from the link above and modified it.  I may post my patterns later if there is interest, so let me know if you want them.

Here's the ear flap version.  LOVE!  Again I modified the pattern, I guess I just can't help myself.  I just took the last row of the ear flaps off so they were less pointy.

Now onto the Quilt projects...

I finished my Walk in the Woods Disappearing 9-Patch quilt on Friday.  See the full post here.  I just adore this quilt and so does my little Miya.  It went together so quickly!  All told I only sewed on it four different days!

I got a bunch of new fabric in the mail.  Here's my littlest man carrying my box that weighed eight pounds.  That's about 1/3 his total weight.  I certainly can't carry 1/3 my totally weight and smile at the same time!

Here it is!  YUMMY!  I got four jelly rolls of Sentiments by 3 Sisters for Moda for my SIL Suzi's quilt.  I got one jelly roll of Meadow by Blackbird Designs for Moda which will be for my MIL.  I got myself two rolls of Serenade by Kate Spain (LOVE HER!) and one of Leaf Bella solids which will turn into a bed quilt for me.  These rolls will need to be supplemented with yardage but I figured I'd get the rolls while they were on sale.   Judi The Green Fairy filled that order for me during her massive Jelly roll sale and threw in a pen.  Need I mention the fabulousness of the Green Fairy?  She's pretty awesome!  Also here is a bunch of yardage I got from Erica's (another store I love) from the Papillon line also by 3 Sisters for Moda.  They will become a quilt for my mother if I can uncover my cutting table this week.

As I mentioned above I also joined my first ever fabric swap this week.  It's the Tetris Color Charm Swap.  I don't think I could geek out any more about this!  We each buy two yards of fabric in two colors and cut them into 112 charms each for a total of 224 charms.  Then Melissa from Happy Quilting swaps them all around and we have all the fabric we need in all the colors for the Tetris quilt-a-long! The colors are assigned.  I received my color assignment this morning (red and orange) and jumped on it.  I picked out and purchased my colors with lightning speed and I just received an email from Intrepid Thread that they have been shipped.  I can't wait to see what other people picked and what I'll be getting!  Here's what I picked...

Fruit Slice - Digi in Tomato

Fruit Slice - Seeds in Tangerine
 As always thanks for stopping by and here's to another productive week!


Monday, June 18, 2012

Finished Disappearing 9-Patch Quilt Top

I finished my Walk in the Woods disappearing 9-patch quilt top on Friday (6/15) and I just love it!  It looks so fancy and was so fast and easy!  As part of the Let's Get Acquainted Blog Hop for new bloggers they have a link up on Mondays.  I thought this would be a perfect post to share to celebrate my recent finish.

Plum and June

I'm also linking up with Lynne at Lily's Quilts for Fresh Sewing Day.  I've seen a lot of the blogs I read linking up and I thought it would be fun to add my name to the list and to check out more of the bloggers there.

Lily's Quilts

While there and linking up I found out about the Small Blog Meet.  It's for bloggers with fewer than 50 followers to meet other bloggers like them and get to know more people.  With 10 lovely followers I fit the bill!  I may be up all night reading all the fun posts that other bloggers have linked up to all these things! ;)

Lily's Quilts

Now, on to the quilt.  I used four charm packs and one layer cake of A Walk in the Woods by Aneela Hoey for Moda.  I got the layer cake on a super sale around Christmas time but after working it out it would have been much easier just to get four charm packs instead of cutting the layer cake in fours.

I love reading about other people's processes so here's how the quilt broke down with fun pictures...

6/1 - I drew up my pattern based on the idea found here.  It came out to be 71.5" by 84.5" which will be perfect for my little girl's bed.  I relied on the pattern a lot for placement and to know which row I was on while sewing to keep track of it all. It was time consuming but well worth it.  The red dash fabric will be the binding and the gray will be the back.

I have a very organized and logical mind and really can't handle random.  I knew I wanted this quilt to be random but I just didn't know how to achieve that.  While thinking this through I stacked all of the charms by color then one pile of large prints, see how I just can't do random?  I just sat and looked until I came up with a great idea.

To create random I got a brown grocery bag and I recruited my family.  I gave my hubby and I two charm stacks each and then each of my big kids one stack.  We took turns putting our charms into the bag one by one.  Then we each stirred it up.  Voila!  Random and family fun in one!

There were some large prints that I didn't want to end up getting cut.  If they were to be cut down there wouldn't be enough of anything showing to make it work.  I put this in a bowl and stirred then make sure to use them in the corner pieces filing in the other pieces from the brown paper bag.

After sewing and pressing I laid them out into groups of nine.  I tried to keep with the random theme but I didn't let any of the same fabric touch each other.  It was kind of fun but difficult because each of my four kids tried to get involved.  I then stacked them up in groups putting each group in a different orientation so I could tell which was which.  I then cracked up my ipod and got sewing some more.

This is the end of one day's work.  The first picture was taken at 11:37am and this one was at 10:12pm with various stops in between to make dinner, do dishes, play with and get the kid ready for bed.  See what I mean about fast?!  I cut one of the nine-patch squares up so I could see what it would look like.  It's at the top of the picture.  I got through half of the pile of nine-patch sewing which was pretty good.

6/2 - By 9pm the next night I had all the nine-patches sewn and then cut and turned.  After a lot of playing around I ended with this layout.  I wanted it to be more or less random so I just grabbed bits and started putting them down.  The directional fabrics I kept all face up (my OCD taking over) and I balanced out the colors here and there.  It worked out pretty well.
 
6/15 - After my hugely productive two days I had to take a break.  There were other more pressing projects and this one was briefly put to the back burner.  However after two more days of sewing the quilt top was finished.  The rows took me about ten minutes each to sew including pressing (so fast!) and then to put the rows together with pressing took me an additional five minutes per row.  I was so happy with how fast it went together but how fun and complex it looks!

6/15 - Here's a fun jaunty angle.  Now I really have to get on taking that long arm quilting class so I can get this bad boy all the way finished!
Thanks for stopping by!  Head on over to Plum and June for some great blog advice and to see other links ups from the Hop!  Also stop by Lily's Quilts to see posts from Fresh Sewing Day and Small Blog Meet!