Friday, May 30, 2014

Foldover Hexagon Tutorial

At my guild meeting this month Emma from Quilties taught us how to make foldover hexagons. I've seen them around lately and thought it would be fun to write up a tutorial on how to make them since I haven't seen one posted.

I'm excited about this method because you don't need to do any hand sewing! You'll need to make your own templates and then have a pair of scissors, an iron, pins, and a sewing machine handy for this.

This is the size of template I used. You can find a hexagon template maker here and just print it on card stock or other heavy paper. It's great for charm squares - the large one just fits. The large size is 2 1/2" on each edge and the smaller template is cut from the center with a 1 5/8" side.

So you cut out one of each size for the number of hexagons you'd like. I did nine of each size. To do this trace your template onto the wrong side of the fabric and then cut just inside the line.

Once you have them all cut out then you're ready for the pressing stage. Use the template to help you center your smaller hexagon inside the larger one. Place them WRONG sides together.

At the meeting Emma suggested pressing at least two at a time this helps reduce burning because by the time you finish pressing the second one the first has cooled enough to touch.

Now press the first side in touching the edge of the outer hexagon to the edge of the inner hexagon butting them up but not overlapping.

Then fold again. With this second fold you are folding it over the inside hexagon and when you top stitch it will be all enclosed. The first fold just butts up to it but the second fold covers the small hexagon. Basically you're just creating a double fold edge. You'll want to use steam or starch to help it stay flat.

Repeat those steps with side two. Fold over the second side until it just butts up but doesn't overlap the inner hexagon. Make sure to make a nice crisp corner.

Fold over again making sure not to fold the inner layer at all.

Then you'll place a pin at the corner to help hold the fold in place. Catch as little as you can with the pin to help it stay flat.

Continue all around the hexagon until it is all folded and pinned. You can give it an extra press here with more starch and steam if you need to.

Then sew around the inner edge with your machine keeping fairly close to the edge. I did about a 1/16" seam pivoting at the folds.

That's all you need to do to complete the hexagons. They are now completely finished with no raw edges hanging out. The pink one on the right is flipped over so you can see the back side.

I'm sure there are many methods to attach these to something so I'll just briefly tell you what I did and leave it at that. I pinned them onto my background fabric then sewed around the outside edge of each hexagon with the same 1/16" seam allowance I used on the inside edge. It holds them in place nicely and looks pretty.

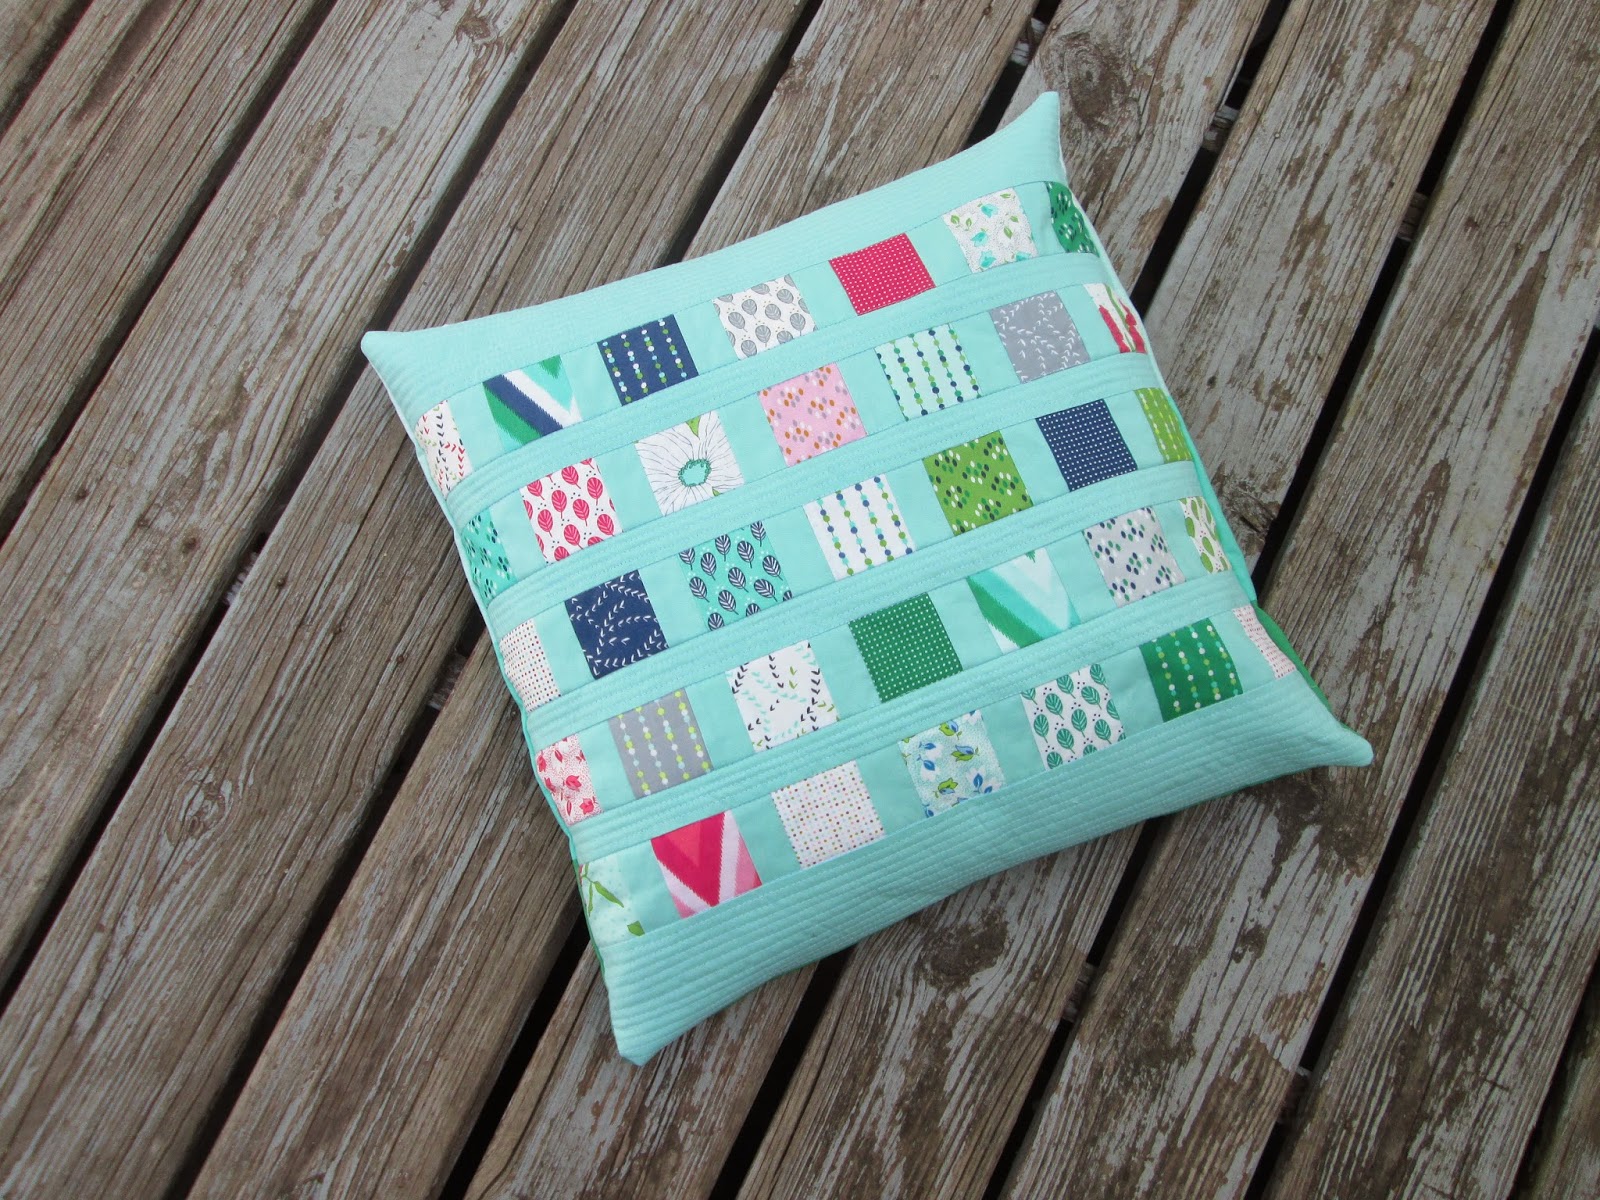
I made a cushion cover with mine doing a bit of echo quilting around the outside of the hexagons.

Here's a bit of a closeup of the pillow. You can see the top stitching really well on the navy one in the bottom left.

Finish off with an envelope backing and you're good to go.
I hope you like this tutorial! Let me know if you have any questions. Thanks for stopping by! I'm linking up with TGIFF and Finish It Up Friday.

Tuesday, May 27, 2014

WiP Wednesday: Passing the Torch

I didn't have a very productive week sewing-wise but I did get a lot of other fabulous things done! One of which was to take the next step in teaching my oldest daughter how to sew. It was so much fun and she loved it! I'm linking up with WiP Wednesday.

I got a custom order from my shop for this adorable sheep hat. This is the teen/adult size and it's so fun! I love how the bobble stitch makes it look more fluffy. This adorable pattern is not my own and can be found for free at Repeat Crafter Me.

So my guild accepts junior members and my nearly eight year-old has been wanting to go ever since she found this out. I told her she needed to know how to quilt first so she's been sweetly asking for sewing lessons ever since. We started with some hand sewing, then a bean bag, and now a patchwork pillow. She picked the squares from my leftover charms bag and had so much fun picking a layout. She tried several different options before she landed on this one.

I tend toward the control-freak side so this was a totally new experience for me being in the other chair. Miya was so awesome sewing though! She did it all herself, guiding the fabric and lining up the edges and she only had to unpick three seams! For each of them it was because she made the seam allowances comically large when she was trying to talk and sew at the same time.

She looks so cute and professional in the sewing chair!

At one point we had a bit of a bobbin problem. Miya loved this! She told me "it looks like the sewing machine wanted to sew a butterfly... flappy flap flap." I can totally see it.

Here she is with her finished top. I'm seriously amazed at how well her corners lined up. All I did was the cutting and the pressing. She can't wait to quilt it and add the backing!

So this is my fabric pull for the Supernova Friendship swap. I had hoped to get these all cut out this week but it didn't happen. I did finish zipper pouches for five teachers and a fun hexagon pillow which you can see here. The Supernova is so next on my list and if it wasn't way past my bedtime I'd do it now!
Thanks for stopping by and putting up with my gushing over my cute girl. I can't get over how fun it is to have a built-in sewing buddy. Two of my other kids are now asking for lessons and my little boy wants me to just make him "more fabulous stuff!"

Friday, May 23, 2014

Pouches and Hexagon Pillow

I love little projects - they are so fast and give me a big sense of accomplishment. I finished six little things since Wednesday. Five pouches for teacher gifts and one cushion cover for my couch.

Here are all my zipper pouches finished up. They were so fun and fast. I did them assembly line fashion and just used white thread for the top stitching on all of them. I cut the fabric 10" by 9" and used a 9" zipper on the ten inch side - using a half inch seam allowance around the pouch.

Here are the fun zippers. A while ago I bought one hundred different zippers from an Etsy store an they worked out to be thirty-five cents a zipper. It was a pretty sweet deal.

One last fun view of the pouches. I can't pick a favorite they're all pretty fun. These are for my children's school teachers and we put a little gift card, a note, and a picture from the kids inside each one.

Here's my fold-over hexagon pillow. I just love how it turned out! The hexagons were fast and easy which surprised me. I did a bit of echo quilting around them but didn't cover the whole thing as I thought it would be overwhelming.

Here's more of a closeup shot. The fabric is Color Me Happy by V. and Co. for Moda. I'm planning on writing a tutorial for the hexagons soon - read in the next few days - and will link it up here.

I did an envelope backing in this cute print from the line.
I'm linking up with Finish It Up Friday and TGIFF.

Wednesday, May 21, 2014

WiP Wednesday: Try New Things

I love trying new things when it comes to quilting or sewing. Patterns, techniques, skills, or fabrics - I like it all! This week I tried some new of all of the above and had so much fun doing it!

These fabrics and zippers are going to turn into zipper pouches for my children's teachers. I let them each pick fabric and a zipper to match. I'm excited about these because I get to use my cute new rotary cutter (my old one was shaped weird and hurt my hand after a bit) and I get to make my own pattern. Zipper pouches have become pretty easy for me now and I can't find a pattern the size I need so I'm just going to figure it out on my own. It's not really a big deal in the grand scheme of things but I'm excited.

I belong to the Des Moines Area Modern Quilt Guild and at our last meeting we learned how to make these adorable hexagons. I'm going to make several of these and attach them to the aqua for another couch pillow. They were so fun and fast to make! You take squares and trace a big or little hexagon on each. Then you place them wrong sides together and double fold the bigger one then sew near the edge. It's totally closed with no raw edge. You can use them alone as a coaster, piece a bunch together as a table topper, or applique them or something. You can make them in any size you want too!

Excuse the bad lighting. We had a crazy storm last night and the grass was too saturated where the lighting was better. I made this Charm Pack Cherry quilt with Mixed Bag for Moda. I just love so many prints out of this fabric line! I'd never seen it before I picked some up on a really good sale and I love it. The fabric is also brushed - I was surprised at the softness as I'd never tried them before. It was fun to make a new-to-me quilt pattern with some new-to-me fabric.
It has been a fun week. I hope to finish the zipper pouches pretty quickly as school is ending in just a few days. The hexagon pillow should also work up pretty quickly and I want to get the quilt basted, at least, before next week. I'm linking up with WiP Wednesday over at Freshly Pieced.

Friday, May 16, 2014

Color Me a Happy Finish

I love all things V. and Co. for Moda. Her latest line Color Me Happy is no exception. I just finished this fun quilt using it and an aqua background and I think I have a new favorite quilt. Do I say that every time? I used the Honey Honey Layer Cake pattern. This was my May goal for ALYoF and on my Q2FAL list.

Here it is in all its wonderful glory! I love the background color. I'm experimenting with things more exciting than white and gray and it's perfect I tell you, perfect!

Check out my fun binding and backing too. I'm loving this navy dot and those little sprouts.

Here's an artsy picture on my new ladder just for fun.

Then another on the red chair - even though the fabric is pink, don't cringe. I love the matching pillow that I made last week from the Contact Print Pillow found at Crazy Mom Quilts.

Here's a picture of me just holding it up. It's usually my hubby's job but he was covered in car grease and I trusted him with the camera this time. I think his job is harder than taking the pictures. All the blood left my arms and to get it from folding over I had to even stretch my little pinkies out all the way.

Here's a closeup of the block. It was a really fun layout and my new Bloc_Loc ruler make the trimming wonderful!

I'll leave you with this one last artsy picture of the bindng/backing. I love it! This is so me. Note how the colors match my new header - perfection!
I'm linking up with Finish It Up Friday and TGIFF and they ALYoF May Post.

Wednesday, May 14, 2014

WiP Wednesday: Web Piecing

So, when I was piecing my several simple patchwork quilts late last year I discovered the awesomeness of web piecing. I didn't find a tutorial or anything I just did it and thought I was so clever, only to discover it was already a thing, but I'm still pretty clever. ;) So now I've applied that into so many of my other quilts that typically aren't pieced that way and I love it! I made two tops this week! I'm linking up with Freshly Pieced for WiP Wednesday.

So last week I just had a bunch of squares and trimmed HST. I got my small people together and we picked a layout. It was fun. I gave them each a pile of HST and then went down the row. Each handed me one and if it wasn't an exact match to the one next to it I flopped it in place. They're much better at random than I am.

With just a few minor adjustments we got this layout done! We needed an adjustment because my oldest daughter is too much like me and sorted her fabric so there was a lot of bold/dark at the top and a lot of low volume at the bottom. It made me smile.

Then we got to the web piecing. This was on Mother's Day - my fabulous hubby gave me the perfect day complete with sewing! So once the quilt was all laid out I piled the fabric by rows then put them in order on my table. Instead of doing it into twelve blocks I just sewed all the first two squares down the side and then continued sewing one square at a time down the columns. I used the totally high-tech method of a pill bottle to keep my place. I was always sewing the one above the bottle. When it was done I'd move the bottle down one and pick up the square that was under it. The system was perfect for keeping my place as my five cute munchkins needed me to stop and go a lot.

In the middle of all of this I found this awesome Supernova Friendship Swap! So basically you get with a friend, just one, and you each sew ten blocks of the Supernova quilt. Five to keep and five to trade. Then you make up the quilt with one extra for the back or a cushion. I couldn't wait!! Izzy from Dizzy Quilts and I are doing it together and these are more or less my fabric choices. I swapped a few of the Navy ones and added another green and a couple of purples. It's not too late to join if you're interested. If you don't have a friend to do it with Stephanie can hook you up too!

So back to the quilt... with the web piecing I finished it up super quick! It took maybe two days to put it all together. Can you tell it was super-windy for the picture? It looks like the words coming down the screen on Star Wars. I also like how you can't see my hubby's feet even though it's blowing like crazy in the breeze.

Here's a closeup of the awesome Color Me Happy fabric and the fun piecing. I love how this turned out! Now I just have to figure out how to quilt it. Suggestions?

This quilt went so fast I don't even have a picture of the progress. I pieced the 324 squares, ironed, and basted it in less than 24 hours. Woohoo! This is our I-Spy quilt and once quilted it is going to be our picnic/firework blanket. I'm so excited!
So that was my fun week. Hurray for web piecing! I hope to get the quilting started on a few of these and not get distracted by the fabric that is coming in the mail today and tomorrow, yeah right! Thanks for stopping by!

Wednesday, May 7, 2014

WiP Wednesday: Winner and Changes

I had a great week! If you're a regular follower you may notice the blog changes. One of my good friends made me this awesome new header. I'm in LOVE!! The colors are so perfect and it's all, dare I say, so Julie?! I'm linking up with WiP Wednesday.

I also picked a giveaway winner. However I don't really know how to copy the image from random.org. So out of seventeen possibilities #13 won who was Janie. She has been emailed and I hope it will get there in time for Mother's day, wouldn't that be fun? The question for my giveaway was what color I should make my new rocker. The overwhelming response was to leave it red. I was really interested in an aqua but come to think of it that color would look pretty odd with my green walls. This dark red is cute and may be the best choice!

Now onto some actual projects...
 
I started this new quilt for me. I'm in love! The background color is what I was thinking for my chair but I may have swung back to red. This quilt is going to be the Honey Honey Layer Cake Quilt over at the Moda Bake Shop.

I also finished this pillow. I'm in love! It's the same Color Me Happy fabric and background as the quilt I'm working on. This pillow was so fun and FAST! I made it from the Contact Print Pillow tutorial found at Crazy Mom Quilts.

Here's the back done envelope style with this fun print from the collection.

Here's a closeup of the pillow and you can see the quilting. I did a bunch of straight-ish lines in the background strips. I love the texture of this one! This fabric is one of my new favorite lines too.

This week I also made this cute little zipper pouch. Isn't the fabric so cute on this pouch?! I don't know any little girl that could resist it.

My five year-old daughter is going to her first birthday party and we're all so excited. I asked the girl's mom for suggestions and she said she loves all the things I make and would love something crafty. So my daughter helped me pick the fabric and the zipper then we filled it with cute stickers and a princess glitter-filled ball. It should be fun.

Ruby thinks she's a big girl now and can sew with me. I bet it's more fun for her than how we used to do it.

She wanted to try sewing for a bit. I was worried I'd run over her fingers so it's not moving but she sure looks like she knows what she's doing.
Thanks for stopping by! I hope to get more work done on that quilt for me this week but my hubby's vacation has ended and he's now headed back to work. Who knows what I'll have time for as we try to readjust.