My husband picked out this super fluffy variegated yarn for our second daughter. She was born in February and I wanted something that would keep her warm so I narrowed it down to the fluffy yarn and he landed with this one. I was worried with all the colors that it would look crazy but I love the way it turned out. It kind of skews tie-die but in a good way. I double crocheted this one and it's probably about 3' X 4'.


Monday, October 31, 2011
Clothing Quilt
My sister-in-law's son died suddenly and she wanted a quilt made from his clothes to remember him by. She wanted a little wall hanging and nothing too fancy. I had a really hard time coming up with what to do and finally decided on using the clothes to make clothes. The tree truck, clothes pole, shirts, and rock as well as the backing were all made from his clothes. I wish I would have spread the leaves out more and let some more sky show through but it is what it is. The rock has his name and birth and death date on it. The sun is a medal that they received because he was an organ donor and it was fun to include in the quilt. The clothes pins are actually little tiny clothes pins and I love how they add to the quilt.


Chicken Quilt
My mom remarried in 2008 and I wanted to make them a quilt to celebrate. They kept chickens together so this chicken quilt seemed like the perfect choice. It was designed to be a picnic blanket but a few simple tweaks and it was a perfect quilt. It came from a book called "Big Book of Quick Rotary Cutter Quilts" and it looks like this...
 |
| This book is full of really fun ideas. The only draw back is they make so many little tiny pieces that are kind of hard to keep track of especially with little helping hands. |
 |
| The finished Chicken quilt turned out so well! I used little chicken fabric for the back and in stead of quilting I sewed on buttons through all the layers. It's a fun and easy way to tie a quilt and add a fun texture element at the same time. |
Changing Pad Slip Cover
Having lived through two kids the cover on my changing table pad was definitely the worse for wear. I thought about buying a new one but they had a lot with curved edges (which I didn't like) and they were expensive (which I didn't have money for). So, as a thrifty alternative I decided to fashion a slipcover for my changing pad - best idea ever! Here's how I did it...
I went to target and found a vinyl table cloth that I liked. It happened to be January at the time and they had a lot of Valentine's stuff out. I loved these hearts. I bought a big table cloth for maybe $6 and then was able to make four changing pad covers from it. I measured my changing pad and added two inches to each side. I measured the length and added four inches. I cut out my pieces. Then I hemmed one end of the skinny side. I folded it lengthwise with right sides together. I made one side the same as my changing table and the other half about 3.5" longer. Sewed down the sides - flipped right side out. Put in my foam pad and tucked the long end around and inside the other end. Voila - beautiful and festive changing pad cover.

I went to target and found a vinyl table cloth that I liked. It happened to be January at the time and they had a lot of Valentine's stuff out. I loved these hearts. I bought a big table cloth for maybe $6 and then was able to make four changing pad covers from it. I measured my changing pad and added two inches to each side. I measured the length and added four inches. I cut out my pieces. Then I hemmed one end of the skinny side. I folded it lengthwise with right sides together. I made one side the same as my changing table and the other half about 3.5" longer. Sewed down the sides - flipped right side out. Put in my foam pad and tucked the long end around and inside the other end. Voila - beautiful and festive changing pad cover.

Golfing Alligator Irish Chain Quilt
My brother and his wife where having their second baby. I always make a quilt for my nieces and nephews so I asked him what he had in mind. They told me a fabric they loved and let me have complete freedom to create with it. I was so excited. There were so many patterns I wanted to try. They picked the golfing alligator fabric. It's flannel which was more difficult but nothing I couldn't handle at this point. I wanted something that looked quilt-like but still showed off the fabric. I ended up with and Irish chain.

I love how it turned out. You can see enough of their fabric choice but it looks quilty at the same time. Irish chains are so fast too I've used that same pattern several times and love it every time. There are two different blocks that you make and alternate them. This quilt has 20 blocks. To make the chain you just sew some strips together in different patterns. Then you cut them to make strips of squares which you sew together to make a big x. I love how fast it is and how simple it is to make everything line up.

I love how it turned out. You can see enough of their fabric choice but it looks quilty at the same time. Irish chains are so fast too I've used that same pattern several times and love it every time. There are two different blocks that you make and alternate them. This quilt has 20 blocks. To make the chain you just sew some strips together in different patterns. Then you cut them to make strips of squares which you sew together to make a big x. I love how fast it is and how simple it is to make everything line up.
Felt Christmas Stockings
My mother made me a felt stocking when I was a baby that I have used for every Christmas. When I got married I decided I liked the look of it so much I've made one for my husband and each of my children (we have four). I have looked around and Herrschners is the best place anywhere to find them. They have so many to choose from and they often have great sales too. I highly recommend this for fun and pretty easy stockings. A quick tip when working with a felt kit - only cut out one piece at a time. That way you won't forget which piece is which and it will save you lots of trouble. Also I used a big tupperware bowl for my floss, beads, and sequins. It was so easy to pick them out from there and then put the lid on in between sewing sessions.
 |
| My husband's stocking is on the far left. My eldest son's is in the middle. Mine that my mother made me is on the far right. |
 |
| Miya is my second child. I loved how fun this stocking was and it's so sparkly. |
 |
| Amelia is my third baby. I wanted each stocking to have something different on it and we were having a hard time deciding what to get. I love the bears around the campfire and it seems like it will work for her when she's older too. |
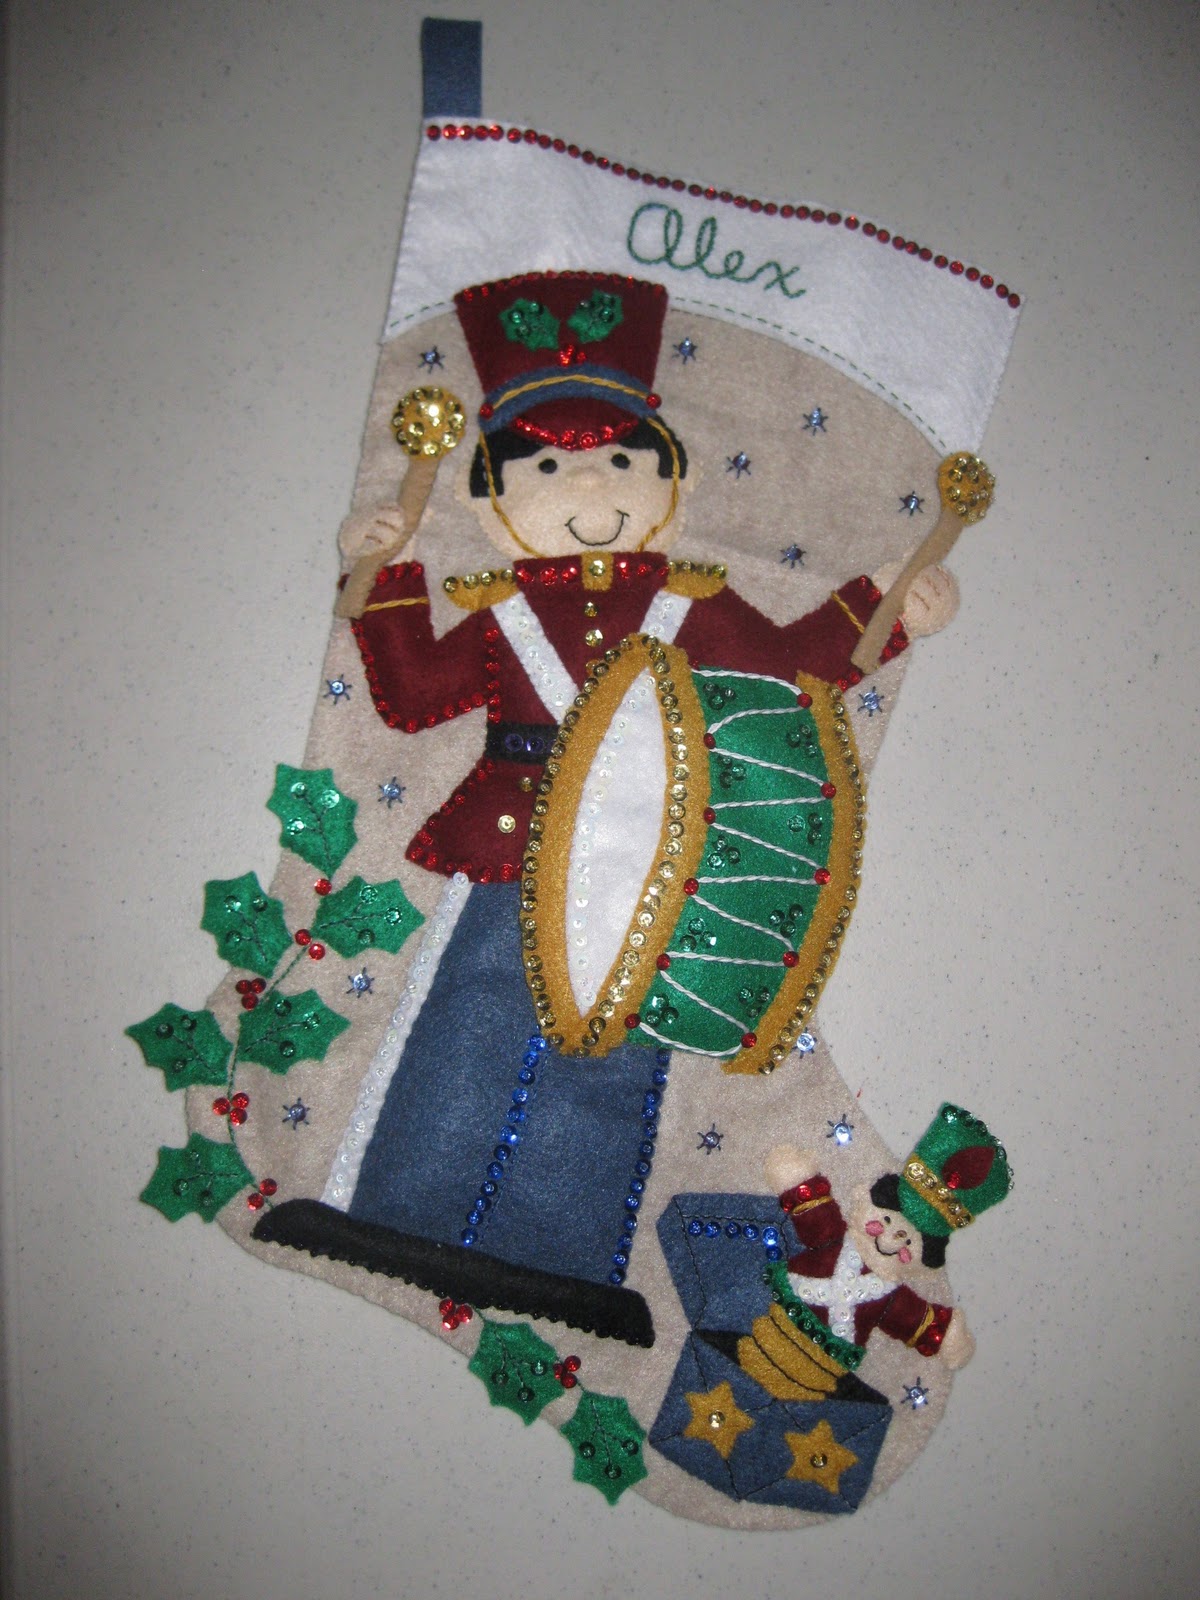 |
| This stocking was the easiest and the fastest by far but I still think it looks great. They had a musical thing you were supposed to put inside the drum that played a song when you pushed it but I left that out. It seems like it would be fun until the battery died then you'd just have this thing sitting in there. |
Lion Costume
I got the inexplicable urge to sew a Halloween costume for my son back in 2006. I found a pattern that I loved and decided to roll with it. It was a McCalls pattern #8938. It looks like this...
 |
| I picked the lion in the middle and was so excited to get started I bought all the stuff right there. |
 |
| Later that week I finished the body of the costume. Although it looked quite complex it was much easier than I thought it would be. It slipped on just like jammies and had a long zipper in the back. I love the ribbon on the tail and chest because it ties in the head piece so much better. |
 |
| The head piece took me a few weeks to complete. I decided to glue the ribbons on instead of sewing them on because it was difficult to get the whole hat into my sewing machine without catching another part of it. I love my little guy's chubby face! |
 |
| Here's the finished product without the cute kid inside. It was so warm which is perfect for Iowa in the fall. |
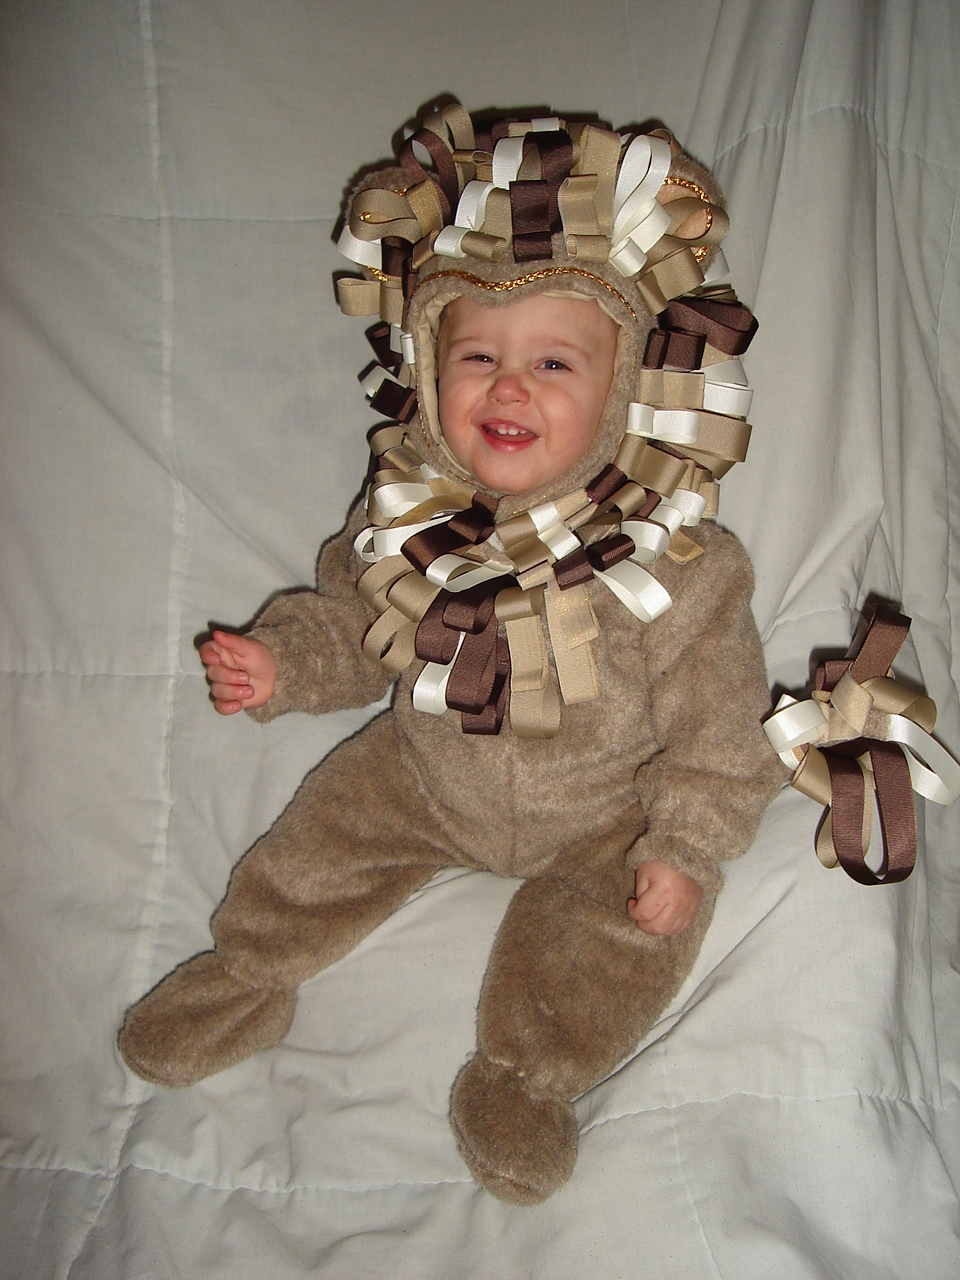 |
| In the end it was totally worth all the work. My little guy was 15 months old and he just loved it. He even learned to roar for Halloween. |
Appliqued Duck with Flying Geese Blocks Quilt
I found a similar pattern for this out of one of my baby quilting books. I wasn't a fan of the duck they had in the middle and I wanted Prairie Points so I changed it up and made it my own. The duck in the middle I actually got off of my shower curtain at the time. I just love ducks and collect them so the duck in the middle just had to be perfect. To get the image for the quilt I traced my shower curtain and then enlarged it and then traced and appliqued from there.
The flying geese blocks were arranged in groups of two to make a square then then those were sown in group of four to make a bigger square. I then sewed these squares together around the center appliqued image.
The prairie points were not as scary as I thought they'd be. I had made a few extra just in case then once the quilt top was all pieced and quilted I sewed them on. I placed them and moved them around until they were just perfect then pinned like crazy. I love the extra bit of fun it added to the quilt and how it continued the whole triangle element.

Animal Applique Quilt
I made this quilt for my firstborn and I love it! Stanley was a popular show back then and I loved the drawings of the animals. I found a Stanley game and was able to copy the pictures of some animals off the game. Then I enlarged them and converted them color by color and piece by piece into an appliqued fabric version. After I ironed them on using iron on fusible web I hand-stitched around each piece to make sure they were secure. Six years and many washes later all the pieces are still intact and the quilt still looks amazing.


Thursday, October 27, 2011
Irish Chain with Applique
This was my first attempt at an Irish chain quilt. It's really not as hard as it looks. You start by cutting strips then sewing those strips into various patterns. Cut those down to make a row of little squares then sew the rows together to make a block. Ta da! Irish chain. Once again I got hung up on the boarder trying to make the boarder fit like it was cut instead of cutting to fit. This was back in 2004 and I've learned so much in the seven years since. Hopefully I keep learning too. I love the applique in the middle of the Irish chain. I think it adds a bit of playfulness that makes it work better as a baby quilt.


Sleeping Bears Quilt
There are so many reasons why I love this quilt. It's so cute! Pastels are my favorite, especially in baby quilts. I think the appliqued bears are so sweet on their little pillows. The only problems with it was it's size. It was tiny. I didn't think to look at the measurements because it was in a quilt book full of crib sized quilts. As it turns out this is the only one that wasn't a crib size. Good thing it's cuteness made up for it's size.


Bright Animals Quilt
I made this quilt for a niece on my husbands side of the family. I love the tilted squares! I think it adds a fun element and would be so easy to add to any other pattern. The bright colors are a shift from my usual choices too but I let her help pick them out, she was four at the time, and I really love how it turned out.


Christmas Tree Quilt
Sadly this is the best picture I have of this quilt. I think I'll have to hit up my sister (the owner) for a better one. Until then you get the idea. This was my favorite out of the Christmas quilt series. I loved the variations on the red and green fabrics. There were doubles of some trees but they were not all the same which, to me, added an organic element to the whole quilt. The trees are appliqued and were fun to both cut and sew. I've been thinking about repeating it for myself but alas, so many other projects loom over me.


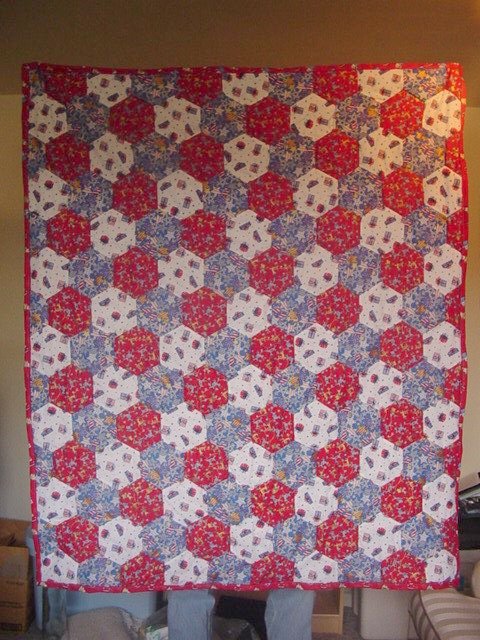
Patriotic Christmas Hexagons
I was so excited to try hexagons! The fabric was really fun too. It has patriotic Santas, reindeer, and the like. This was before the days of accuquilt and I had to cut this bad boys out with a rotary cutter and a plastic template. It wasn't as hard as it sounds. I layered them five high then four fast cuts per hexagon. I then sewed the rows together horizontally. The zigzag stitch sewing them all together wasn't as bad as you might think either. The whole quilt came together really quickly with no major problems. Hexagons are on my list for a repeat but I think I may do smaller ones with a sort of flower arrangement.

Christmas Star Quilt
I made this quilt as a gift for my mom. She picked out the pattern and all of the fabric. There were so many different fabrics and she loved them all. If you look closely and study it you can see a sort of pattern. Each block has an opposite where I switched the main and background fabrics. I placed on the flip side of the quilt. It's hard for me to make quilts without a discernible pattern. I have a quilt that was store bought and given to me for my wedding. It's pretty but doesn't have a pattern. I've sat for hours looking at this trying to figure out a pattern and decided what would have to change to create one. So even though this quilt has so many different fabrics there's still a pattern for my sanity.


Red, Green, and Cream Quilt
I LOVE this quilt! It was difficult with all the little tiny pieces but totally worth the effort. The red and green looked so great contrasting together and I love the tiny eight point stars. There were no major flaws and it's fun to look at. Now seven years later, I have some regrets. I wasn't as precise as I could have been with my seem allowances and ever the years the use and wear has caused some of them to come undone. The binding has also come loose and it needs a general mend. Maybe that happens to all well loved quilts or maybe I cut corners in my inexperience. Now I'm a serious perfectionist with the seam allowances and I pull on each seem I create to make sure it's secure and can withstand a lot of love.


Holly Applique Quilt - Pin It
In 2004 I made five Christmas quilts in one year. The concept of this one was fabulous and I love the fabric but it didn't quite turn out the way I wanted it to. Lesson learned... place all the pieces before you iron on any applique. Then pin them into place where possible so you don't forget. I had this all evenly and perfectly spaced. It looked beautiful but then it came to ironing them on. I obviously couldn't fit the whole quilt on my iron and instead of pinning them I just figured I could judge where they should go. I looked fine up close but the far away picture you can tell how they aren't even. It's still pretty and a great quilt but I wish I had taken the extra time to pin.


Kite Quilt - What I Learned.
I love the idea for this quilt. I love the fabric, I love the design, I love how I tied it with ribbon for the kite strings instead of quilting it, and I love (mostly) how it turned out. However, I'm a perfectionist and the outer boarder really had some struggles. Here's what I learned so you don't make the same mistake...
- Make sure all cuts are precise! Especially with the smaller pieces. The smaller the pieces the more seams and the more room for it to be all crazy and not lined up.
- Cut the boarders to match your quilt. Even if it makes it smaller (or larger) than you planned on it being. Stuff happens and if the boarder matches your quilt it won't tent, bunch, stretch, or look in any way bad.
- Leave PLENTY of room with the backing. DO NOT TRIM UNTIL IT'S DONE! That is the huge failing with this quilt. Notice the bottom right corner. It's all rolled over and crazy because I thought I cut the back to the right size. I thought I had the boarders all right, and I thought it would work out fine. I thought wrong.
- Accept that quilting is an art. It's hard work. However, even with the flaws that will inevitably occur, it's still BEAUTIFUL!

You can find this pattern in a book called "Our Best Seasonal Quilts" I love the book and have used it several times.
Tigger Quilt with Directions
I adore this quilt! It was my first attempt at applique and while I think I rocked it I have learned so much since. For example, if you use iron fusible web make sure you sew around the entire appliqued piece, that way, when you wash it, the pieces will stay in place and not shift or curl.
For this quilt I started out with pictures of Tigger that I found on the internet. I took them to a copy store and had them enlarged to the size I wanted them to be. Then, to make the lines easier to see I traced them with a Sharpie. Once they were all traced I labeled each section what color it would be and gave them each a number to make it easier later. Then I took the fusible web. It has a thin paper side and the scratchy Iron on side. You place it on your picture, paper side up, then trace all the shapes of the same color. For example, on this quilt, you would start with all the black stripes. Trace out each stripe and make sure to write the number on the paper to keep the pieces straight. When finished cut off the section you traced and iron it onto the wrong side of the black fabric. Cut out each shape, you can do this all at once or as you need them.
Once you have all your pieces traced, ironed on, and cut out you are ready for assembly. It's a pretty quick process. Start with the base pieces. Peel off the paper, place them where you want them and iron on. Sew around each piece before ironing on the next piece. I use a button hole stitch or anything with a bit of a zig zag to it. Add a few boarders and finish up. Voila!

Purple Square Weave Quilt
I was quite ambitious with this quilt and decided to design my own pattern. It was only the fifth quilt I ever made. It was back in 2002 for my sister's baby girl. My sister loved the animal print and really wanted me to use it in the quilt. The only problem was it was made of knit. If you've ever sewn with knit you know it can be a huge pain with the stretching and such. Quilting with knit is nearly impossible. There are a few spots where it really doesn't line up but all things considered I'm really happy with the way it turned out. It was fun to design one myself and I caught the bug for many projects to come.


Primary Colors Truck Quilt
This is the sixth quilt I made. It was back in 2003 for my sister's new baby boy. She wanted something fun and simple with primary colors. I think it turned out really well and I love how fluffy it looked all done up.


Friday, October 21, 2011
I Love My... Accuquilt Go!
My quilting world is a much better place since the Accuquilt Go! entered my life. I love to quilt, it's probably my favorite hobby but cutting has always been a pain. The Go! is like a Cricut for fabric. You buy some dies and a mat slap on your fabric, run it through the machine and you get perfect cuts every time.
 |
| Here's a stock photo of what the Accuquilt can do. |
 |
| I cut out 262 diamonds in 45 minutes while watching TV. It doesn't get any better than that. |
 |
| The is the quilt I made with the diamonds. My brother and his wife were having a baby and she loves argyle. I thought it wouldn't be that hard to create and it turned out beautifully. |
I Love My... Yarn Tainer
As a mother of four small children and an avid crafter I love anything that makes my life easier. Snapware makes something called a Yarn Tainer and it has seriously improved my crocheting experience.
 |
| Here it is. You just plop in the entire skein, thread
the end through the hole one the top and viola, you're ready to go! The
worst things my kids can do to my yarn now is pull out more. It stays
tangle-free and seriously makes me a happier person. This is obviously
a stock photo because I don't knit but you get the idea. FABULOUS! A quick tip for when you're storing yarn but not using it... Grab a bit of yarn from the inside and close it in the lid, that way you can't pull anymore out through the top. |
Crochet Slip Knot
In my years as a crocheter I have seen some CRAZY ways to do a slip knot. As it is the first thing you do when you are learning how to crochet you don't want it to be too overwhelming or people will give up before they even try. Thus, I decided to post on how I do it. This slip knot is so easy my husband can do it and he hasn't crocheted a day in his life. So here we go, the step by step with pictures...
 |
| Step 1: Get a good sized piece of yarn. |
 |
| Step 2: Fold yarn over into a loop. |
 |
| Step 3: Twist loop so it forms an X. Make sure the short end of the yarn is on the bottom of the loop farthest from your face. |
 |
| Step 4: Reach through the loop and grab the short side of the yarn the one on the bottom. |
 |
| Step 5: Pull through. I included a few picture of this one so you could really see it. Make sure you hold tight with your other hand to both ends of the yarn so it doesn't go all crazy on you. |
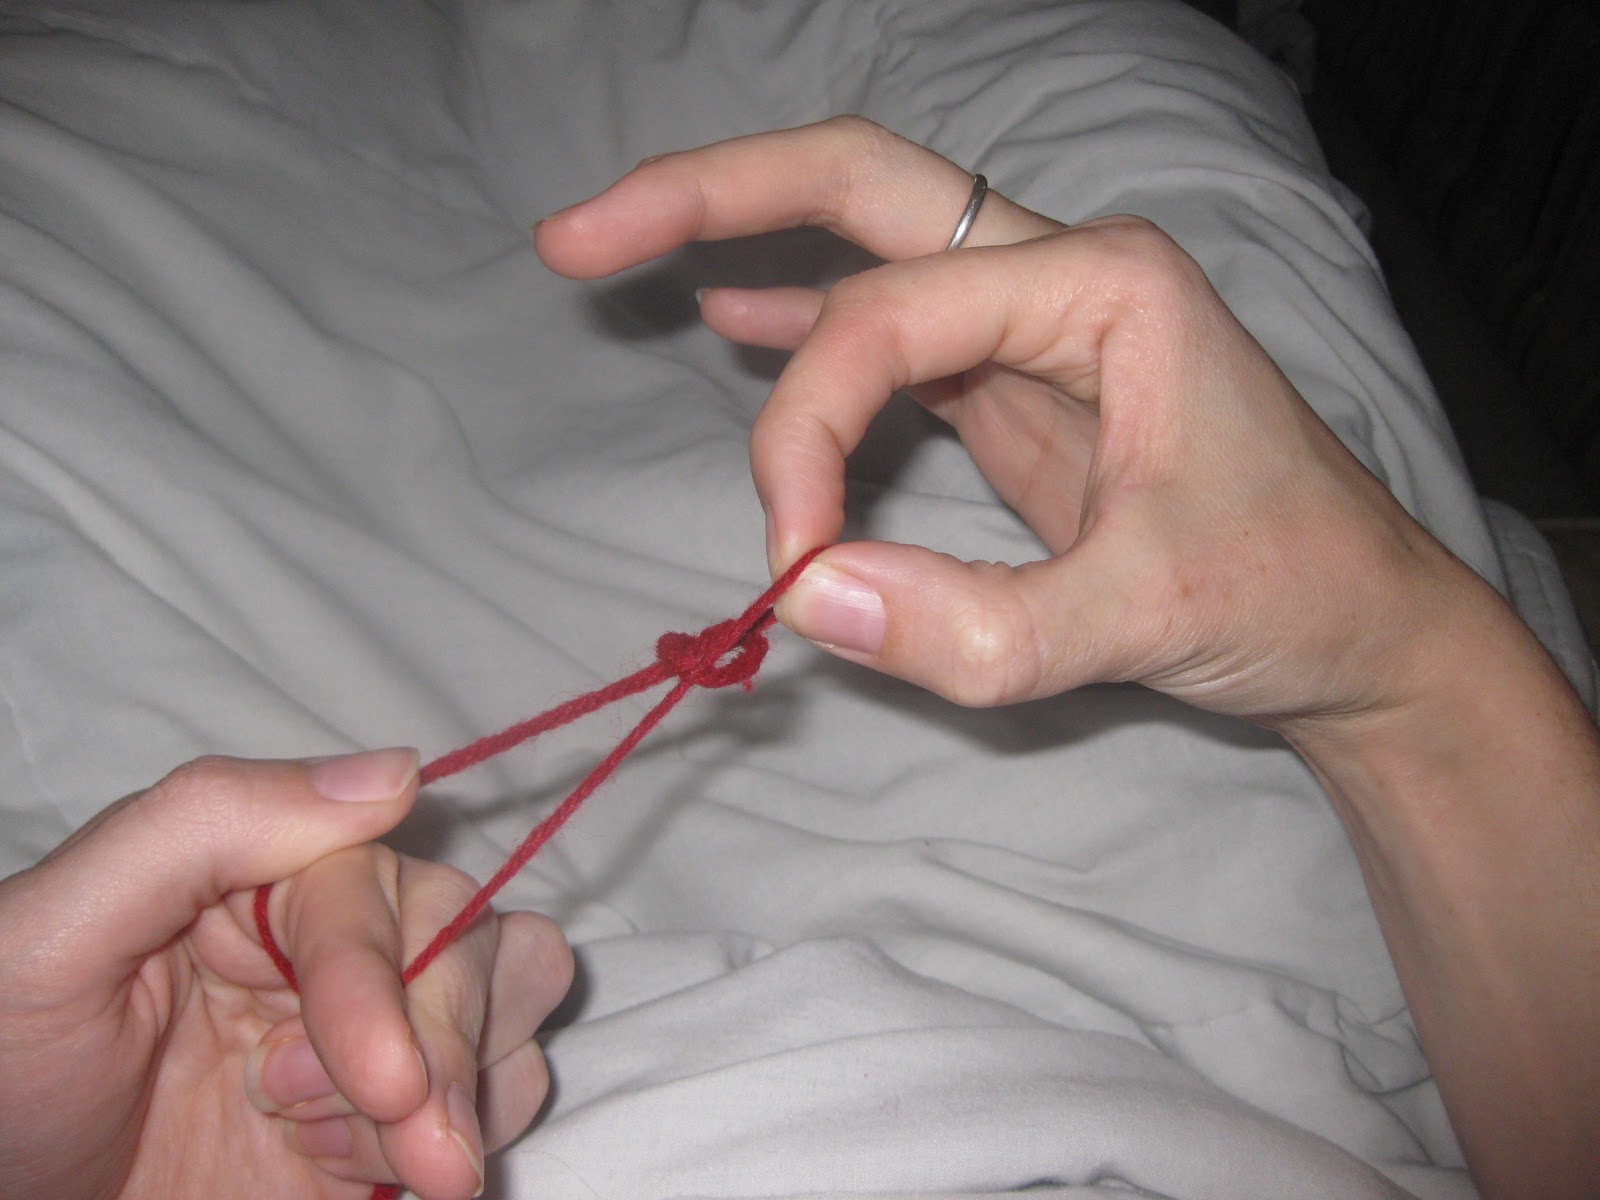 |
| Keep Pulling |
 |
| You're done pulling when it looks like this. |
 |
| Step 6: Insert hook and pull the shorter end of the yarn to make it tighten all the way. The End. |
Subscribe to:
Posts (Atom)