As part of my stop on the Let's Get Acquainted Blog Hop I decided to write up a tutorial. I've never done one this detailed before so I'm kind of nervous/excited about it. I got the idea for this hand-print crab here. The original was done with paint on regular paper but I easily converted it to fabric. I'm linking up with the Oh Sew Baby! over at Fort Worth Fabric Studio Blog. Ready? Let's go...
Let's start by making the hands that will become the crab.
- Now your hands are all ready to go and it's time to create the background. This is the easy part!
Optional: If you'd like your crab to have a mouth now would be the time to sew it on there. I didn't like the smiley face so I left it off. My family and everyone else I've asked has been totally split over the whole thing so it's really up to you. There are eyes too but I sewed those on last so they wouldn't get in the way of the quilting.
Now it's time to quilt and bind it.
And you're finished! One super cute crab animal made out of your favorite small person's handprints. There are many variations to this. You could also do owls, elephant, giraffe, eagle, and so many more. The only limit is your imagination. Try pinterest or a quick Google image search for more handprint craft ideas.
Since this is my first step-by-step tutorial I'd appreciate any feedback you may have to offer me. Thanks for stopping by! Be sure to stop by the other hop stop today with Chelsea from Pins and Bobbins.
 |
| The is the end result you're going for. It's 12.5" square. The original had a mouth but I wasn't in love. You can add one if you'd like. |
Let's start by making the hands that will become the crab.
 |
| Step One: Grab your favorite small person and trace their hands with the pen or pencil onto the piece of paper. |
 |
| Optional Step: Go over the tracing with marker. This step is not required but it does make the next step a bit easier. |
 |
| You can see the difference the marker makes while trying to trace the hands onto the fusible web. |
 |
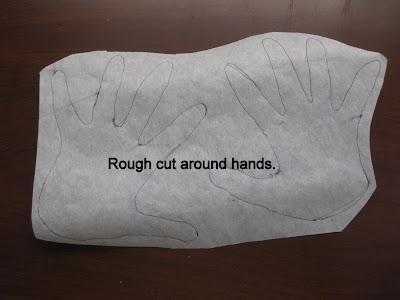
| Step Three: Roughly cut around the traced hands. This step doesn't have to be perfect in fact it's easier to cut it out like this and do the precise cutting after it's ironed on. |
 |
| Step Five: Carefully cut out hands along the traced line. If you notice a bit of wonkiness to your tracing you can trim it at this point to make it the perfect hand shape. |
- Now your hands are all ready to go and it's time to create the background. This is the easy part!
 |
| Step Seven: Out of the ocean print cut a piece that is 8" x 12.5" |
 |
| Step Eight: Sew the sand piece to the ocean piece and press the seam either open or toward the ocean piece. I hate pressing open (I always burn my fingers) so I pressed toward the fishies. |
 |
| Step Ten: Get the hands just where you want them to form the crab. Make sure your iron is on all the way hot and again with no steam. Iron the hands onto the background. |
Optional: If you'd like your crab to have a mouth now would be the time to sew it on there. I didn't like the smiley face so I left it off. My family and everyone else I've asked has been totally split over the whole thing so it's really up to you. There are eyes too but I sewed those on last so they wouldn't get in the way of the quilting.
Now it's time to quilt and bind it.
 |
| Step Twelve: Cut a background piece (I used the sand color) and a batting piece slightly bigger than your block. Since the block is 12.5" I cut mine at about 14.5" |
 |
| Here's the back side. I really think it makes the hands pop! Those wavy lines sure are fun too! |
Since this is my first step-by-step tutorial I'd appreciate any feedback you may have to offer me. Thanks for stopping by! Be sure to stop by the other hop stop today with Chelsea from Pins and Bobbins.


Your tutorial turned out great!
ReplyDeleteGreat tutorial I love the idea, but I don't have children, maybe I should try it with my doggies paw prints lol
ReplyDeleteGreat tutorial Julie, easy to follow and lots of photos which always help so much, thanks. Good to get to know you better as well on the blog hop :)
ReplyDeleteCute idea, I'll have to try it with my grandtwins.
ReplyDeleteWhat a great idea!! My kids are older, but when I come across something they long-ago made for me out of their little hands, I get teary. Such a nice keepsake! Great job on your first tutorial!!
ReplyDeleteWhat a cute project, and a lovely way to save the handprints :D Your tutorial was really clear, thank you!
ReplyDeleteVery cute! I would love it if you joined and contribute your awesome posts at my link party at City of Creative Dreams, starts on Fridays :D Hope to see you there at City of Creative Dreams Link Party.
ReplyDeleteCute!
ReplyDelete