Wednesday, April 11, 2012

WIP Wednesday: Hexagon Progress

My daughter encouraged (read: nagged incessantly) me to work on her quilt a lot this week and thus I got a lot done.  Also because of her insistence it was the only thing I worked on this week and thus encompasses the whole of my WIP Wednesday post.  The pattern is called Hexagon Park and I found it over at Moda Bake Shop (LOVE!).  I knew I had to make it and when I found this fabric Cape Ann by Oliver + S I knew I HAD to have it for my little girl.  The fabric fits her to a T and I love each and every print in the line, which is rare.

Anyway, here are my photos from my work this week.  To read about the beginning of this quilt check out the post from last week.

I've discovered a love for chain piecing.  I've done it a few times before, not really though.  I was moved to change while working on some recent quilt blocks and now I can't get enough and do it all the time.  I'm amazed at the thread it saves if nothing else.  You really can't tell the scale from this picture but each piece is about five inches along the shortest side.  The whole chain is over twice as tall as I am and I'm six feet tall (amazon, I know).  My thread was on its last round on the spool and I was certain I couldn't finish the chain but I did and then sewed the trim to the other side of the chain too before the thread ran out.  AMAZING!  I'm sure it's faster too but for me this time it was all about the thread.

Here's the layout of the quilt, it's so stinkin' cute!  This is just the main center part.  There is are two white boarders and one pieced boarder I have to add still.  My three year-old is just going to love this thing to death.  I had to play around with the blocks to get just the right arrangement and I'm pretty happy with how it turned out.  It's more or less balanced while still looking random.  You'll notice that the hexagons are cut in half for this quilt.  I've done a regular hexagon quilt before see this post and this way is SO much easier!  I kind of feel like I'm cheating though.  I worry about the strangest things!

I sewed together 6 of 12 rows for the center of the quilt top.  It's coming together so nicely and after I figured it out in the first row my seams are lining up great.  I'm just so happy with how well it's turning out!  I finished all this by Saturday and I only started cutting on Wednesday.  Not bad for four days work I'd say.  I haven't worked on it since what with Easter and then other crazy things around the house.  It's calling my name though and I hope to finish the top this week.
No progress:
• A Walk in the Woods Quilt
• Skill Builder Sampler
• Never-ending Afghan


This week's stats:
Completed projects - 0
New projects - 0
Currently in progress - 5

WIP Wednesday at Freshly Pieced

Monday, April 9, 2012

One Thing, One Week Challenge: Finished and Then Some!

 Amy over at Amy's Creative Side does something called a One Thing, One Week Challenge.  When it's going on Monday you pick what you want to accomplish that week and write it down as a comment.  When the next Monday rolls around if you finished you can link up and get a chance to win some fancy fabric.  I've always attempted participation in the past but I've overestimated what I could accomplish and was never able to link up.  This week a suppose I underestimated but that's okay!  I got a lot done and I'm so happy with my progress.  Not only did I finish my goal of three Wonky Blocks for my Skill Builder Sampler but I also finished a huge chunk of the quilt for my adorable three year-old princess.

Without further ado here's my fancy finishes...

Block #25 Wonky Log Cabin- I love how it turned out!  It's so fun, fast, and easy!  I think I will made this block again maybe even for a whole quilt.

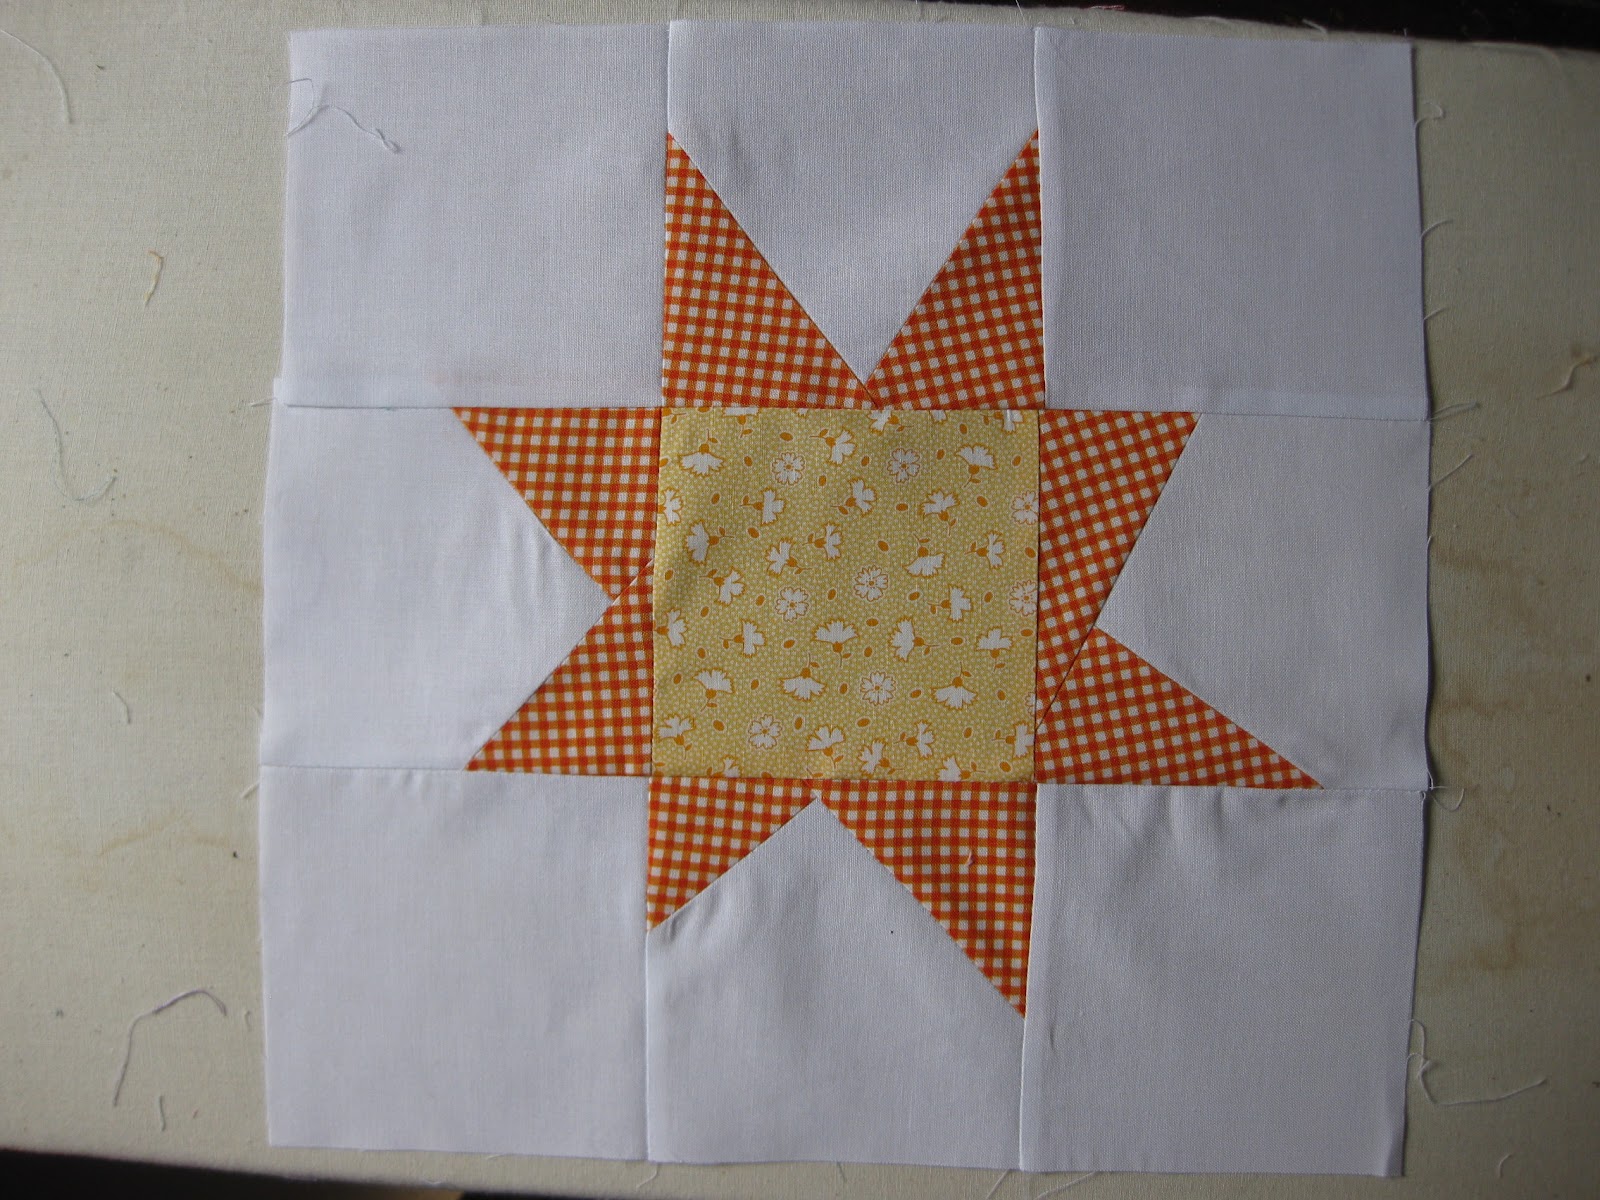
Block #26 Wonky Star - I was nervous about this one because I was worried I wouldn't do the triangles right and it would either look like I just couldn't sew straight or be so wonky that you couldn't tell it was a star.  I think it turned out well though.

Block #27 Wonky Fan - This block gave me the most trouble and while I love it I don't know that I'll be attempting one again any time soon.  I had to take in some of the seams after the top half was already sewn down because it wouldn't lie flat.  I suppose that would have been solved if I had just pinned like I was told but in all honesty I despise pinning and I thought I could get away with it.  I did pin the green center though and it turned out much better.  I guess I must follow the rules.

I chose the Wonky Blocks as my goal this week because Leila over at Sewn was having a giveaway and if I finished by Friday I would be entered for a chance to win this amazing fabric.  I was in love and I had to go for it.  Miracle of miracles I won!  I literally jumped up and down when she told me and made a little scene but what can I say I rarely win stuff.  Isn't it just adorable fabric!!

So in addition to the Wonky Blocks I also got half the center portion of my little girls quilt done.  I cut into it on Wednesday and I am already this far!  I'm amazed with how cute it is and how fast it's going together.


If you're interested follow the link at the top and check out other people's goals and finishes for this week.


Wednesday, April 4, 2012

WIP Wednesday: Try New Things

It's that time again, WIP Wednesday, my favorite day to post.  I've been very adventurous this week trying new things that I didn't think I could ever do.  Leila over at the Sewn has been doing Wonky Blocks for this month in the sampler.  At first I was terrified of them because I'm quite the perfectionist and I didn't think I could do them without breaking out in a sweat but I loved it!  Who knew?  They were so fast and easy and it was encouraged to not have your corners line up.  I also did another block toward my catch-up efforts.

Here are the Sampler blocks...

Block #10 - Ohio Star Quilt Block - I really like the way this one turned out.  I still need some work on my QST but I'm improving and that what the Skill Builder Sampler is all about right?  I knew how to trim better this time around because I actually read the directions (imagine that).  Before I just trimmed on two sides, that does not create an even QST.  Now I know.

Here's my previous attempt at Block #10.  I know I keep saying it but I really like the colors in the new blocks better.  They seem to flow and coordinate nicely.

Block #25 - Wonky Log Cabin Quilt Block - It would appear that I like to tilt the ruler to the left when making my wonkiness. My little girl helped me pick the fabric and the order for this block.  It was so fun to work with her on a project but she kept telling me after each seam that I needed to stop and work on a quilt for her now.  We're all about taking turns here.

Block #26 - Wonky Star Quilt Block - I've seen many of this block with a slight wonk to it but I wanted to be sure that people could tell that it was meant to be crooked and not that I just can't sew.  I think I managed it.  This block reminds me of a sun as drawn by a toddler.  I love it!

Block #27 - Wonky Fan Quilt Block - I had some issues making this one wonky enough.  Then when I got a good enough wonk it wouldn't lay right.  I had to flip it over and take it in a few times.  It still has a little bit of a wrinkle to it but overall it's good enough I think.

My three year-old finally convinced me to get started on her quilt.  I was tired of having it in the "no progress" section on my WIP posts.  Last night I opened up the layer cake, the first one I've ever opened, and sorted out the blocks.  It was fun to see and play with them all.

Months ago I decided on the Hexagon Park pattern found over at the Moda Bake Shop.  It was love at first sight and I knew I had to have this quilt in my life (corny, I know).  It's what inspired me to make quilts for each of my kids to go on their beds.  I have four children who sleep in a twin bed each but we only have two twin blankets.  They are getting a little big to be sleeping under their baby quilts so it seems like the perfect time to get started.  Anyway, back to this quilt.  I cut out 60 trapezoids that will end up making 30 hexagons.  It took me about two hours of cutting but it wasn't difficult just time consuming.  The jar is full of the triangles I cut off from the layer cakes.  They are not in there for freshness but to keep away from little hands as I'll need them later in the quilt.  It has the added bonus of looking pretty.

No progress:
• A Walk in the Woods Quilt

This week's stats:
Completed projects - 0
New projects - 0
Currently in progress - 5


WIP Wednesday at Freshly Pieced

Wednesday, March 28, 2012

WIP Wednesday - Sampler Craziness

Every week Lee over at Freshly Pieced does a Work in Progress Wednesday, or WIP Wednesday.  She has a link section at the bottom where people like me can submit our projects for that week.  I just LOVE this idea and I have been an active participant for a few months now.  For just about as many months as I have been participating I've wanted to catch up with the Skill Builder Sampler my friend Leila has been doing and this week I made TONS of progress.  I did blocks #3 to #9 and bonus block #1.  I've learned a few things along the way and basically had a lot of fun.  I've worked on nothing else this week so this post is all about the Sampler.

Block #3 Churn Dash - I love the way this one turned out.  The greens look so great!  I would love to see a whole quilt done in this block with a variety of colors or maybe even a bunch of the same.  It would be fun to see the additional patterns this would make.

While working on block #4 I learned about trimming down to create a perfect HST.  It seems unbelievable to me that I have quilted for 15 years and never have done this.  I guess I thought it was cheating and that I should be able to just make them perfectly in the first place (yeah, right!).  It took a while but I can't argue with the perfect results.

Here are all my perfect HSTs and the trimmings.  I set aside one piece to show the tiny shavings I'm removing but over a whole block and a whole quilt it really does make the difference.

Block #4 Pinwheels - See how perfectly it all came together thanks to the trimming?  I'm so excited I learned something so useful!  This block is just beautiful!  I've never made a pinwheel before so it was fun and super easy.

Block #5 Arizona - I think this is the best block as far as color combination so far.  I love how it turned out!  I also like how crisp it looks.  So many of these would be fabulous with their own quilt and this is one of them!

Block #6 Bow Tie - I love the red and white on this one.  The bow tie was SO FAST!

Block #7 Virginia Star - We tried flying geese for the first time in the sampler with this block.  I was a little nervous but the traditional method worked well for me and it all lined up great.  I like showing off the light gray print in the middle as it was one of my favorite pulls for this quilt.

Block #8 Breaking Out - FAIL!  Well, my husband thinks I'm crazy but I think I totally failed at this block.  Especially the dark purple geese don't line up and there are huge chunks of white showing.  We used the "magic method" and I tried really hard but came up lacking.  Some of them turned out well but some of them were about 1/4" off.  Needless to say I need practice with the magic method and in the mean time I'll be sticking to traditional.

Block #9 Double Star - I went back to the traditional method of piecing the geese for this block and it turned out beautifully!  I went with an alternate layout of this block and just love how it turned out!  The gray and purple are so fun together!  I don't know what it is about my camera that makes dark purple skew blue but some time I'll figure it out.

To help with cutting directions and to keep track of the color combinations I have used without having to take out all the blocks every time.  I love seeing them at a glance like this.
Bonus #1 Zigzag - As part of the series Leila takes the time to teach basic skills like quilt math.  For this block she discussed how quilt math works and then set us to work designing our own block for the bonus.  This is what I came up with.  It's a zigzag using 2.5" strips.  I cut them 2.5" by 4.5" and just sewed them all together following my drawing.  I love the crisp clean lines.

WIP Wednesday Stats:

No progress:
• Cape Ann Quilt
• A Walk in the Woods Quilt

This week's stats:
Completed projects - 0
New projects - 0
Currently in progress - 5

WIP Wednesday at Freshly Pieced

Wednesday, March 21, 2012

WIP Wednesday - Back from Boston!

Last week I missed WIP Wednesday because we all took a trip to see some of my family in Boston.  I had a great time visiting with My Mom, Step-dad, Sister and her family.  While there I managed to whip out a couple of things and I made a few more since returning so I'm excited that it's WIP Wednesday again!

Completed!
Not pictured - I made two more of the green crochet necklaces.  Go near the bottom of this post if you have no idea what I'm talking about.  My mom and sister each wanted one and I couldn't resist whipping them up while I was out visiting.

My Sister's baby was getting blessed at church and she wanted super-soft booties to go under her dress.  I was excited when I found this pattern because it was actually a pain finding tiny booties in a free pattern to make her.  I don't mind shelling out money for booties I just didn't have the time to wait for the pattern to be emailed to me.  They turned out cute and as soft as she wanted them.  They stay on pretty well when next to skin but with tights they kept slipping off which was a bummer.

I had some extra yarn from the booties - they used so little - so I decided to make a matching hat.  I bought another skein of variegated super-soft yarn and started with the pink and ended in the multi.  I love the pattern and it turned out great but like previous hats for this particular child it was slightly too big.  I have made a lot of other hats recently and they all seem to fit just fine but this baby I can't make a hat to fit her head at the right time, it's just a little too baggy and slippery to stay on for long.

Here I am holding the sweet baby in her hat.  She looked so pretty!

My husband said he would help more around the house if he knew what he should be working on.  He even bought me a fun Chore Chart Cricut cartridge to help me along.  I don't know if I made it the wrong scale, used the wrong paper, or what because the little layers were TINY!  Some of them I just omitted because they were too small to work with.  That being said I think it's just fabulous and it has helped amazingly with out cleanliness already.  I made it yesterday and I got two gold stars for each day as a reward for completing my chores.  I'm thinking about some sort of reward system if I do all of them for the week but I haven't come up with what yet.  I'd take suggestions.

Progress!
- No picture - crochet afghan.  I did two more rows but it hasn't really changed since the last picture so I didn't bother with one this week.

- I restarted the Skill Builder Sampler!  See this post for the explanation of why this was a necessity.

Block #1 - Log Cabin

Block #2 - Value 9 Patch

No progress:
• Cape Ann Quit
• A Walk in the Woods Quilt

This week's stats:
Completed projects - 5
New projects - 0
Currently in progress - 5
WIP Wednesday at Freshly Pieced

Old Projects in their Own Home

Last week I went to visit my Mom and sister Katie.  While there I got to take pictures of some projects that I completed but didn't get pictures of or didn't have very good ones of.  I made the quilt 10-12 years ago and just never got a picture of it.  It was on of my first and quite difficult for my skill level and the tools I had at my disposal but I tackled it anyway.  It looks a little improv but it's not, I just wasn't that great back then.  ;)

I wonder how much of my struggling with this quilt was me and how much of it was the pattern being crazy hard.  Each block is about 8" x 10" so you can see just how TINY the windows were.  I had to cut out each little teeny tiny piece and sew them together.  It was painstaking!  I'm pretty proud that it turned out as good as it did.  Looking at it I feel like I should try again with my more updated skill set but I have so many other projects and my mom still loves it.

My Mom and Step-dad have decorated their kitchen in chickens.  When I saw this crocheted hot pads I couldn't resist.  Here they are in their proper homes.  I just love the chicken hooks holding them up!

Here's the Momma chicken propped in the beak of another.  I think they just look so great in their kitchen that I couldn't resist sharing a picture.

How seriously adorable is this Sock Monkey Hat on my sister's baby!  I just can't stand how much I love it!  It's supposed to be Newborn size and she's 2 months now and it fits her pretty well.  I can't decide if she has a small head or if I just made it too big.  It's so hard to tell with babies.

Skill Builder Sampler - Restart

Several months ago I found out my friend Leila over at Sewn by Leila was doing a Skill Builder Sampler.  Basically she brakes quilting down into beginner language and teaches different skill starting basic and working toward more difficult blocks.  Currently she is on block #26.  I joined in on block #10 but never really progressed with it in spite of her fabulous tutorials.  I struggled to find the answer as to why I wasn't into it because I had great interest in the project.

Recently I decided it was because of my fabric.  Each time I had to do a block I'd go through my three tubs of fabric to try and find the perfect one that also coordinated with other blocks I had previously finished.  It was a painstaking process that I rarely took the time to do.  So, today I went out and bought the fabric I needed to do the whole project.  Now I only have 12 to narrow it down from instead of who knows how many scraps.

Here are my new fabrics... I also bought a 12.5" square ruler and I just LOVE how easy it is to work with.  My 6" X 24" is kind of bulky in my small workspace.

I was sort of going for a rainbow thing but I adored these two grays and just had to work them in.  I combined orange and yellow and made room in my 12 fabrics for some gray.

After reading all her fabulous starter posts like basic tool requirements and fabric care I was ready to get started.  I briefly wondered where to begin and decided to start at the very beginning - a very good place to start (think Sound of Music).  Here is Block #1...

I had done some similar things to a Log Cabin but I've never done a true one before so this was interesting.  I think it's funny that I've tackled some pretty advanced things like a Double Wedding Ring quilt - post here - but skipped over the more basic blocks.  I really like how it turned out especially since it was exactly 12.5" square!  I struggled with that on the blocks I've already done for the sampler.

After finishing the first block I just couldn't wait to get on to Block #2!  Here's my version...

I think the block turned out really well and I love the colors within each 9-patch but I don't know how I'm feeling the colors on the whole block.  It seemed good when it was all laid out but now I just don't know.  I like the contrast between the dark blocks and the light blocks so maybe it's okay.  Either way I'm super excited at how well my corners lined up and that I didn't have to use my fancy 12.5" square ruler to trim it down at all because it was the PERFECT size!